This tutorial contains two different methods to resolve the “Application not found” error message in Mail settings item in Windows Control Panel. The “Application not found” error, commonly is because you have installed the wrong Office version (32/64bit),or because you have not removed properly the previous Office version, before installing the new one.
Problem in details: When you try to open the “Mail setup – Outlook” settings (Email Accounts, Profiles, Data Files) from the “Mail” shortcut in control panel, you receive the “Application not found” error and the “Mail Setup” settings doesn’t open.

How to to fix: “Application not found” When Opening the “Mail” Setup application from Control Panel.
Note: Keep in mind that you can also launch the “Mail Setup” settings, from Outlook “Accounts” menu (options). To do that in Outlook 2010, 2013 & 2016 go to File –> Info –> Accounts & in Outlook 2003 or 2007 go to Tools –> Accounts.
Method 1. Remove and Reinstall the correct Office Version (64 or 32bit).
The first method for resolving the “The application was not found” error in the “Mail” item in Control Panel, is to remove the current MS Office version and then to reinstall the MS Office version which designed for your OS version (32-bit or 64-bit). To do that:
1. Download and run the Office Removal Tool.
* Source: https://support.office.com/en-us/article/uninstall-office-from-a-pc-9dd49b83-264a-477a-8fcc-2fdf5dbf61d8
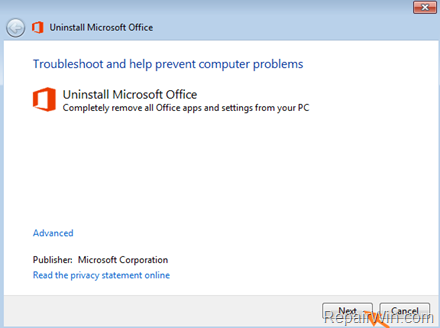
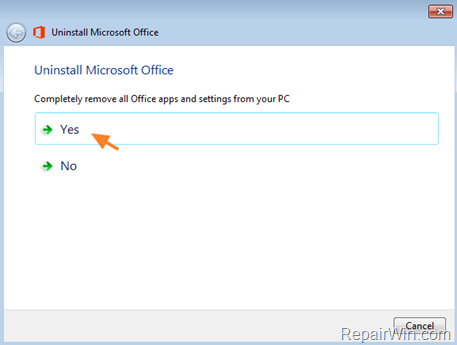
2. When prompted select Yes to remove all Office apps from your PC.
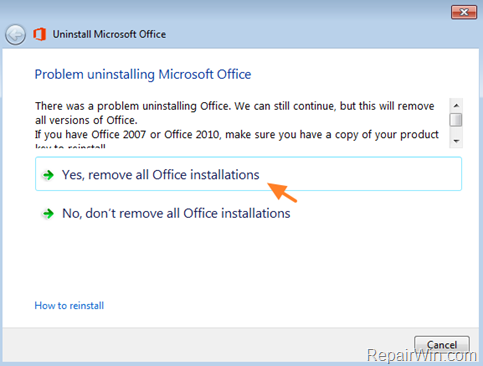
3. If prompted click to remove all Office installations.
4. When the uninstall process is completed, restart your PC.
5. After restart, check if you own 64-bit or a 32-bit OS. To do that, right click at “This PC” (“My Computer”) icon and select Properties.
6. Verify the OS version you have (64-bit or 32-bit)
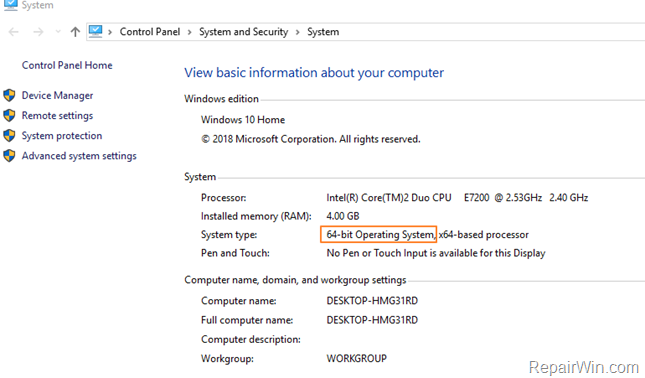
7. Then, according your OS version, download and install MS Office. *
* Important: If you have 64-bit OS then install Office 64-bit. If you own a 32-bit OS then install Office 32bit.
8. After installation, proceed and install all Office updates.
9. Finally try to open the “Mail Setup” application from Control Panel. If the problem persists, then follow the steps in method-2 below.
Method 2. FIX “The application was not found” in Mail App by Modifying Registry.
The second method, to resolve the “application was not found” error, in “Mail” (control Panel) item, is to correct the problem using registry.
1. Open Registry Editor. To do that:
1. Press the Windows
+ R keys to open the run command box.
2. Type: regedit and press Enter.

2a. In registry Editor navigate to the following key, according your OS :
Windows 10 32 or 64bit:
- HKEY_LOCAL_MACHINESOFTWAREClassesCLSID{A0D4CD32-5D5D-4f72-BAAA-767A7AD6BAC5}DefaultIcon
- HKEY_CLASSES_ROOTCLSID{A0D4CD32-5D5D-4f72-BAAA-767A7AD6BAC5}DefaultIcon
Windows 10 64–bit (only):
- HKEY_CLASSES_ROOTWOW6432NodeCLSID{A0D4CD32-5D5D-4f72-BAAA-767A7AD6BAC5}DefaultIcon
Windows 7 OS:
- HKEY_LOCAL_MACHINESOFTWAREMicrosoftWindowsCurrentVersionControl PanelCpls
2b. Open the Default REG_SZ * value at the right pane, and change the value data with the value given below according your Windows and Office version, and then click OK. **
* Notes:
1. In Windows 7 OS your have to modify the mlcfg32.cpl value.
2. If you unfamiliar with Registry Editing, then you can launch the “MAIL Setup” application, from its source on the disk. To do that, just double click at the “MLCFG32.CPL” file from the below locations.
- Office 2016/2019/365 (32bit) & Windows 10 (32bit):
C:Program FilesMicrosoft OfficerootOffice16MLCFG32.CPL,0- Office 2016/2019/365 (32bit) & Windows 10 (64bit):
C:Program Files (x86)Microsoft OfficerootOffice16MLCFG32.CPL,0- Office 2016/2019/365 (64bit) & Windows 10 (64bit):
C:Program FilesMicrosoft OfficerootOffice16MLCFG32.CPL,0————————————————————-
- Office 2013 (32bit) & Windows (32bit):
C:Program FilesMicrosoft OfficeOffice15MLCFG32.CPL,0- Office 2013 (32bit) & Windows (64bit):
C:Program Files (x86)Microsoft OfficeOffice15MLCFG32.CPL,0- Office 2013 (64bit) & Windows (64bit):
C:Program FilesMicrosoft OfficeOffice15MLCFG32.CPL,0————————————————————
- Office 2010 (32bit) & Windows (32bit):
C:Program FilesMicrosoft OfficeOffice14MLCFG32.CPL,0- Office 2010 (32bit) & Windows (64bit):
C:Program Files (x86)Microsoft OfficeOffice14MLCFG32.CPL,0- Office 2010 (64bit) & Windows (64bit):
C:Program FilesMicrosoft OfficeOffice14MLCFG32.CPL,0————————————————————
- Office 2007 & Windows (32bit):
C:Program FilesMicrosoft OfficeOffice12MLCFG32.CPL,0- Office 2007 & Windows (64bit):
C:Program Files (x86)Microsoft OfficeOffice12MLCFG32.CPL,0
e.g. If you own Office 2016 (64bit) & Windows 10 (64bit), then you have to modify the Default REG_SZ value to: C:Program FilesMicrosoft OfficerootOffice16MLCFG32.CPL,0 at these two (2) locations in the registry:
- HKEY_LOCAL_MACHINESOFTWAREClassesCLSID{A0D4CD32-5D5D-4f72-BAAA-767A7AD6BAC5}DefaultIcon
- HKEY_CLASSES_ROOTWOW6432NodeCLSID{A0D4CD32-5D5D-4f72-BAAA-767A7AD6BAC5}DefaultIcon
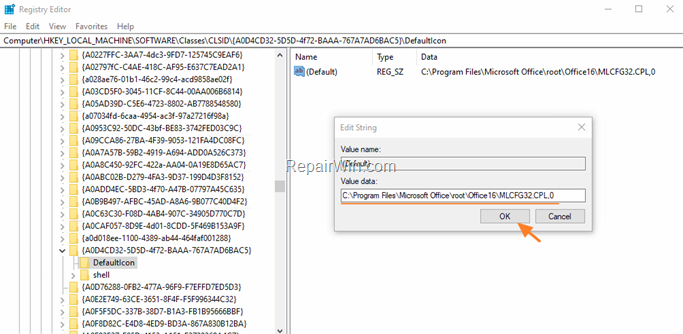
3a. Next, proceed and change the Default REG_SZ value at the following keys, with the value given in Note-1 below, according your Windows and Office version:*
Windows 10 32 or 64bit:
- HKEY_LOCAL_MACHINESOFTWAREClassesCLSID{A0D4CD32-5D5D-4f72-BAAA-767A7AD6BAC5}shellopencommand
- HKEY_CLASSES_ROOTCLSID{A0D4CD32-5D5D-4f72-BAAA-767A7AD6BAC5}shellopencommand
Windows 10 64–bit (only):
- HKEY_LOCAL_MACHINESOFTWAREClassesWOW6432NodeCLSID{A0D4CD32-5D5D-4f72-BAAA-767A7AD6BAC5}shellopencommand
- HKEY_LOCAL_MACHINESOFTWAREWOW6432NodeClassesCLSID{A0D4CD32-5D5D-4f72-BAAA-767A7AD6BAC5}shellopencommand
- HKEY_CLASSES_ROOTWOW6432NodeCLSID{A0D4CD32-5D5D-4f72-BAAA-767A7AD6BAC5}shellopencommand
Windows 7 32 or 64bit:
- HKEY_LOCAL_MACHINESOFTWAREClientsMailMicrosoft OutlookshellPropertiescommand
Windows 7 64bit:
HKEY_LOCAL_MACHINESOFTWAREWow6432NodeClientsMailMicrosoft OutlookshellPropertiescommand
* Note-1: Change the Default REG_SZ value with the value given below, according the installed Windows and Office version:
- Office 2016/2019/365 (32-bit) & Windows (32-bit):
“C:Program FilesMicrosoft OfficerootClientAppVLP.exe” rundll32.exe shell32.dll,Control_RunDLL “C:Program FilesMicrosoft OfficerootOffice16MLCFG32.CPL”
- Office 2016/2019/365 (32-bit) & Windows (64-bit):
“C:Program Files (x86)Microsoft OfficerootClientAppVLP.exe” rundll32.exe shell32.dll,Control_RunDLL “C:Program Files (x86)Microsoft OfficerootOffice16MLCFG32.CPL”
- Office 2016/2019/365 (64bit) & Windows (64bit):
“C:Program FilesMicrosoft OfficerootClientAppVLP.exe” rundll32.exe shell32.dll,Control_RunDLL “C:Program FilesMicrosoft OfficerootOffice16MLCFG32.CPL”
————————————————————————-
- Office 2013 (32bit) & Windows (32bit):
rundll32.exe shell32.dll,Control_RunDLL “C:Program FilesMicrosoft OfficeOffice15MLCFG32.CPL”
- Office 2013 (32bit) & Windows (64bit):
rundll32.exe shell32.dll,Control_RunDLL “C:Program Files (x86)Microsoft OfficeOffice15MLCFG32.CPL”
- Office 2013 (64bit) & Windows (64bit):
rundll32.exe shell32.dll,Control_RunDLL “C:Program FilesMicrosoft OfficeOffice15MLCFG32.CPL”
————————————————————————-
- Office 2010 (32 0r 4bit) & Windows (32 or 64 bit):
rundll32.exe shell32.dll,Control_RunDLL “C:Program FilesMicrosoft OfficeOffice14MLCFG32.CPL”
- Office 2010 (32bit) & Windows (64bit):
rundll32.exe shell32.dll,Control_RunDLL “C:Program Files (x86)Microsoft OfficeOffice14MLCFG32.CPL”
- Office 2010 (64bit) & Windows (64bit):
rundll32.exe shell32.dll,Control_RunDLL “C:Program FilesMicrosoft OfficeOffice14MLCFG32.CPL”
————————————————————————-
- Office 2007 & Windows (32bit):
rundll32.exe shell32.dll,Control_RunDLL “C:Program FilesMicrosoft OfficeOffice12MLCFG32.CPL”
- Office 2007 & Windows (64bit):
rundll32.exe shell32.dll,Control_RunDLL “C:Program Files (x86)Microsoft OfficeOffice12MLCFG32.CPL”
e.g. If you own Office 2016 (64bit) & Windows 10 (64bit), then you have to modify the Default REG_SZ value to: “C:Program FilesMicrosoft OfficerootClientAppVLP.exe” rundll32.exe shell32.dll,Control_RunDLL “C:Program FilesMicrosoft OfficerootOffice16MLCFG32.CPL” (with quotes), at these three (3) locations in the registry:
- HKEY_LOCAL_MACHINESOFTWAREClassesCLSID{A0D4CD32-5D5D-4f72-BAAA-767A7AD6BAC5}shellopencommand
- HKEY_LOCAL_MACHINESOFTWAREWOW6432NodeClassesCLSID{A0D4CD32-5D5D-4f72-BAAA-767A7AD6BAC5}shellopencommand
- HKEY_CLASSES_ROOTWOW6432NodeCLSID{A0D4CD32-5D5D-4f72-BAAA-767A7AD6BAC5}shellopencommand
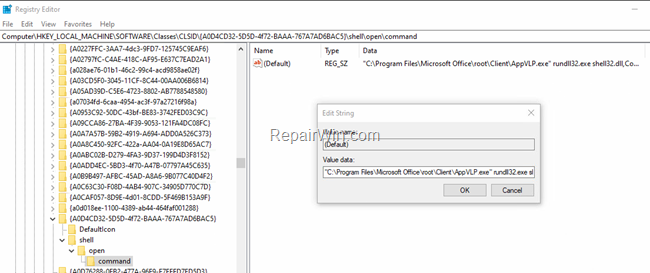
4. Close Registry Editor.
5. From now on, you will be able to open the Mail application in the Control Panel.
* Additional TIP: If the “Mail” item (in control panel) is displayed with an incorrect name {e.g. if you have the Outlook 2007 installed and the displayed name is “Mail (Microsoft Outlook 2016)”}, then change the LocalizedString REG_SZ value to “Mail (Outlook 2007)”, at the following registry key:
Windows 32-bit or 64-bit:
- HKEY_LOCAL_MACHINESOFTWAREClassesCLSID{A0D4CD32-5D5D-4f72-BAAA-767A7AD6BAC5}
Windows 64-bit:
- ComputerHKEY_LOCAL_MACHINESOFTWAREClassesWOW6432NodeCLSID{A0D4CD32-5D5D-4f72-BAAA-767A7AD6BAC5}
That’s all folks! Did it work for you?
Please leave a comment in the comment section below or even better: like and share this blog post in the social networks to help spread the word about this solution.

