In all Windows versions, the Windows Update program, automatically checks, downloads, and installs the available updates, drivers or hotfixes in order to keep your computer always updated with the latest patches and features. Until previous versions of Windows (Windows XP, Vista, 7, 8 & 8.1), the user was able to choose whether and when Windows will install the available updates or to completely disable the Automatic Update of Windows, but…
Unfortunately, in Windows 10 Microsoft has removed the ability from the user to prevent the download and the installation of particular updates, or, to permanently disable the Windows update service and as a result of that, all updates are automatically downloaded and installed, despite user’s decision.
In this guide you ‘ll find several ways to permanently stop Windows 10 updates, as well as how to pause (or to defer) updates if you own Windows 10 Professional, Enterprise and Education versions.
How to Prevent Windows 10 Automatic Update.
- Method 1. Disable Windows Update Services through Registry. (Windows 10 All Versions).
- Method 2. Turn OFF Windows 10 Update by Modifying Update Settings in Registry. (Windows 10 All Versions).
- Method 3. (New) Stop Windows 10 Update by Renaming the WUAUENG.DLL file (Windows 10 All Versions).
- Method 4. Block Windows 10 Updates by using a program. (Windows 10 All Versions).
- Method 5. Disable Automatic Updates by using Group Policy in Windows 10 Pro/Enterprise/Education.
- Method 6. Pause Updates from being installed in Windows 10 Pro/Enterprise/Education
- Method 7. Defer the installation of Feature Updates in Windows 10 Pro/Enterprise/Education.
Method 1. Disable Windows Update Services by modifying Registry. (Working on all Windows 10 versions)
In Windows 10, you can not prevent Automatic update, by disabling only the “Windows Update” service, as you could do in previous Windows versions. Now, in order to turn off Windows 10 updates, you have to disable the below mentioned services from Windows Registry:
- Update Orchestrator Service (UsoSvc)
- Windows Update Medic Service (WaaSMedicSvc)
- Windows Update Service (wuauserv)
1. Press Windows ![]() + R keys to open the run command box.
+ R keys to open the run command box.
2. Type regedit and press Enter.
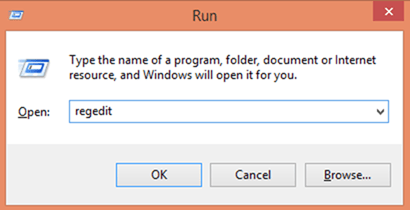
3. In Windows registry editor locate the following key:
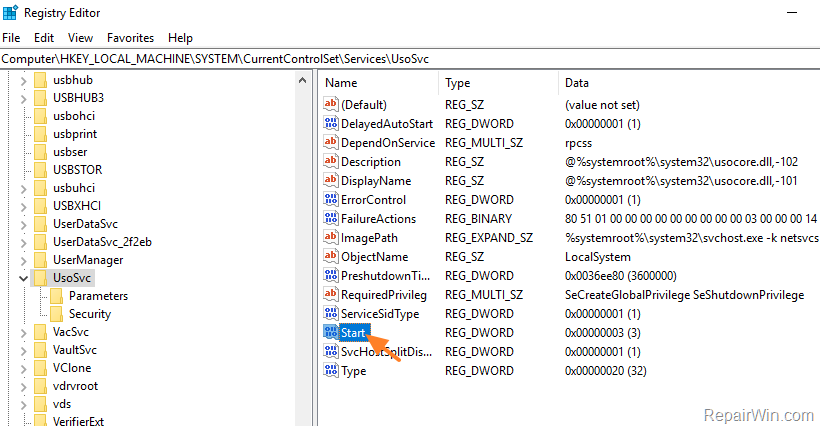
HKEY_LOCAL_MACHINESYSTEMCurrentControlSetServicesUsoSvc
4. Look at the right pane and double click at Start DWORD value.
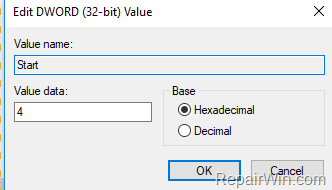
5. Change the value data from the default value 2 to 4 and click OK. *
* Service Startup States according the “Start” DWORD Value:
0 = Boot
1 = System
2 = Automatic
3 = Manual
4 = Disabled
6. Perform the same actions and change the value data of Start DWORD value, from 3 to 4 at the following keys:
- HKEY_LOCAL_MACHINESYSTEMCurrentControlSetServicesWaaSMedicSvc
- HKEY_LOCAL_MACHINESYSTEMCurrentControlSetServiceswuauserv
7. Finally right click on the WaaSMedicSvc key on the left pane and choose Rename.
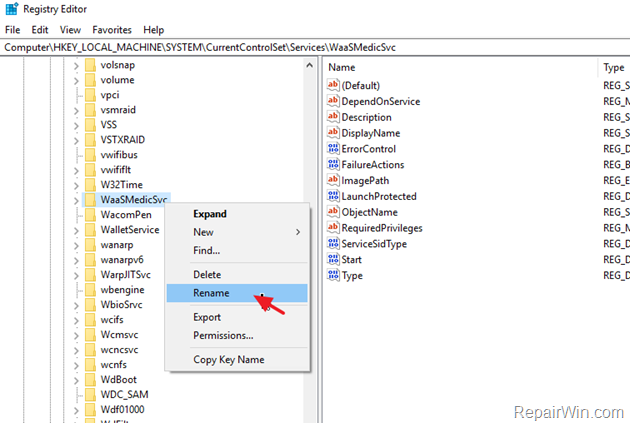
8. Change the name to WaaSMedicSvc.BAK and press Enter.
9. Perform the same actions and rename the wuauserv key to wuauserv.BAK
10. When done, close registry editor and restart your computer.
* Note: If you want to enable updates in the feature, open Registry Editor again and undo the above changes.
Method 2. Turn OFF Windows Update by Modifying Update Settings in Registry. (Windows 10 All Versions).
Another method to turn off Windows 10 updates permanently, is to modify the Windows update settings in Registry.
1. Press Windows ![]() + R keys to open the run command box.
+ R keys to open the run command box.
2. Type regedit and press Enter.

3. In Windows registry editor locate the following key: *
HKEY_LOCAL_MACHINESOFTWAREPoliciesMicrosoftWindowsWindowsUpdate
* Note: If the ‘WindowsUpdate’ key doesn’t exist follow the instructions below to create it:
1. Right click on Windows key and select New -> Key
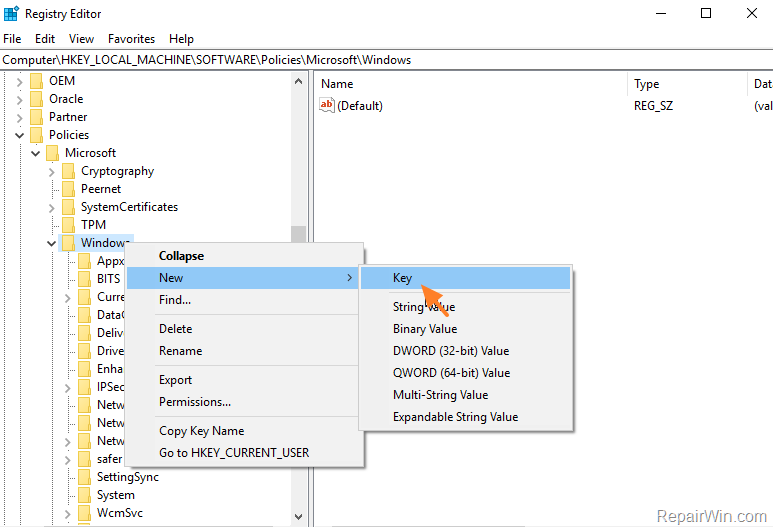
2. Name the new key WindowsUpdate and press Enter.
4. Right click at right pane and select New > DWORD (32-bit) Value.
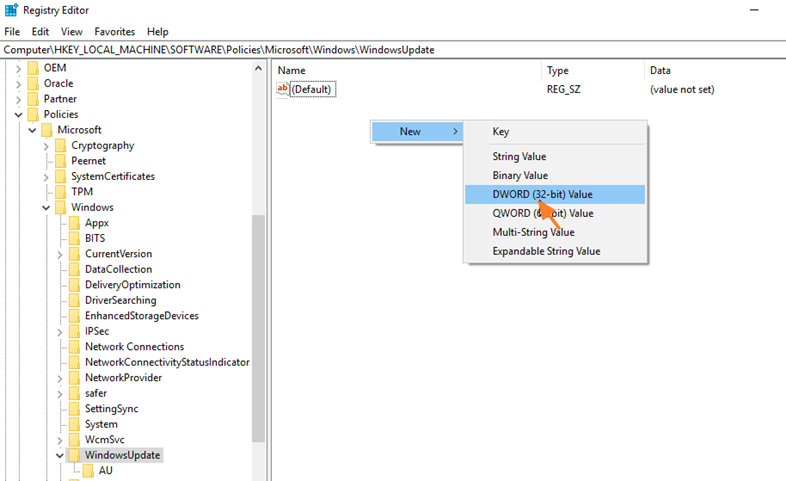
5. Name the new value DoNotConnectToWindowsUpdateInternetLocations and press Enter.
6. Double click at the new value and set the value data to 1.

7. Perform the same steps and add a new DWORD value and name it DisableWindowsUpdateAccess and set the value to 1
8. Then right click again at the right pane and select New > String Value.
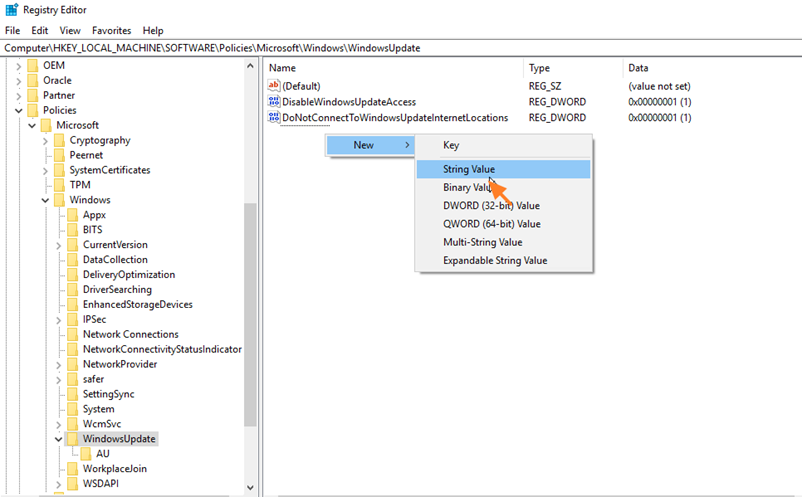
9. Give at the new value the name WUServer and hit Enter.
10. Perform the same steps and create another String value and name it WUStatusServer
11. Now open each new created value and at the value data box type: http://noupdate01.com/
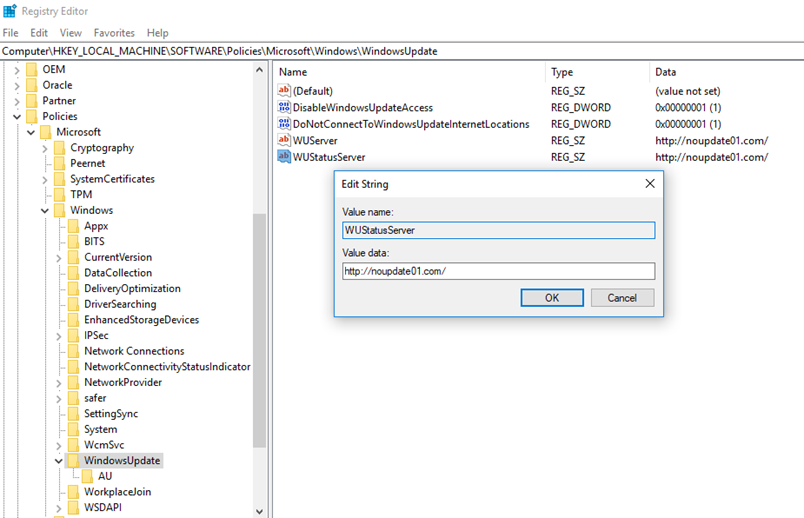
12. Then, at the left pane, expand the ‘WindowsUpdate’ key and highlight the AU key. *
* Note: If the ‘AU’ key doesn’t exist follow the instructions below to create it:
1. Right click at WindowsUpdate key and and select New -> Key.
2. Name the new key AU and press Enter.
13. At the right pane, right click on the empty space and select New -> DWORD Value
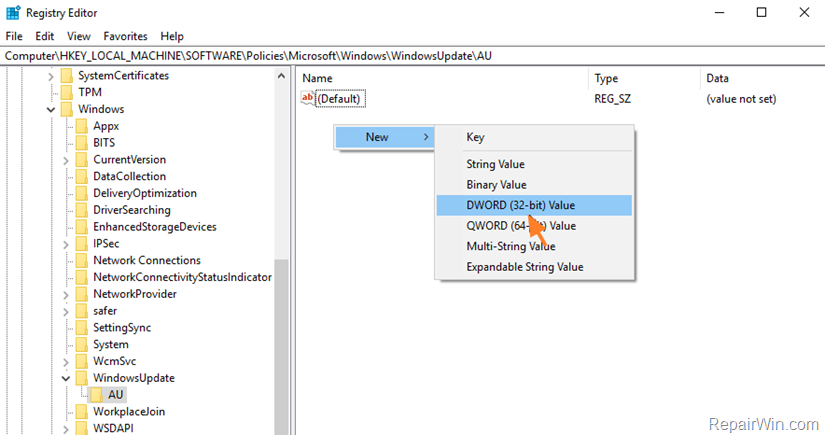
14. Name the new value UseWUServer and hit Enter.
15. Then double click at UseWUServer and set its value data to 1.
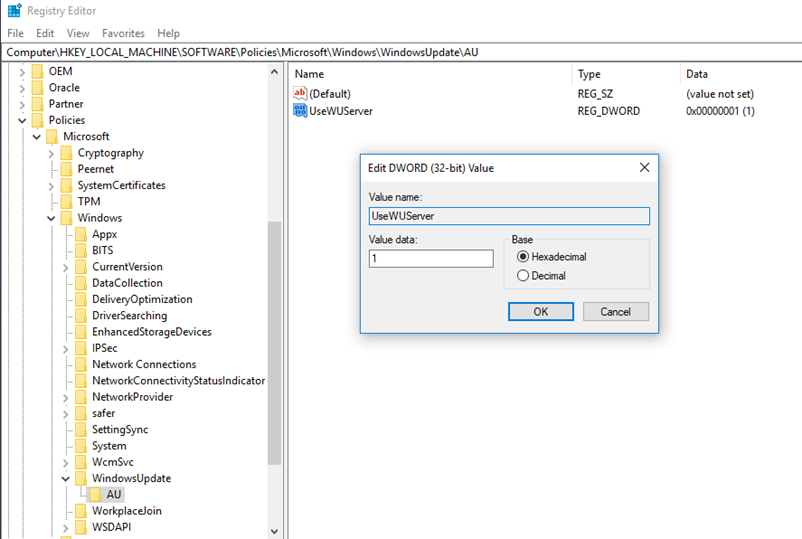
16. Close registry editor and restart your computer.
17. After restart if you Check for updates, you ‘ll receive the following error: “There were some problems installing updates, but we’ll try again later. If you keep seeing this and want to search the web or contact support for information, this may help: (0x8024002e)”

Method 3. Stop Windows 10 Update by Renaming the WUAUENG.DLL file (Windows 10 All Versions).
Recently, I discovered another simple method to prevent Windows 10 automatic update: Rename the Windows Update service file “WUAUENG.DLL”.
1. Navigate to C:WindowsSystem32 folder.
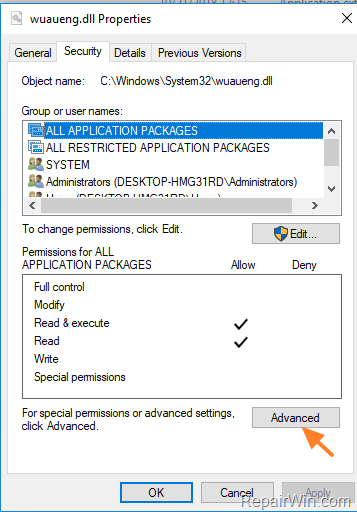
2. Right click on wuaueng.dll file and choose Properties.
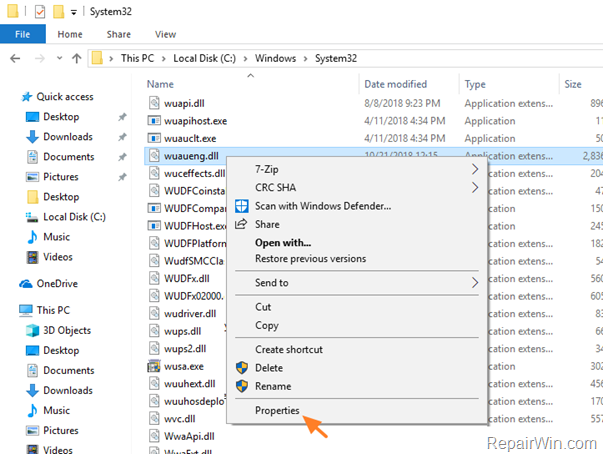
3. At Security tab click Advanced.
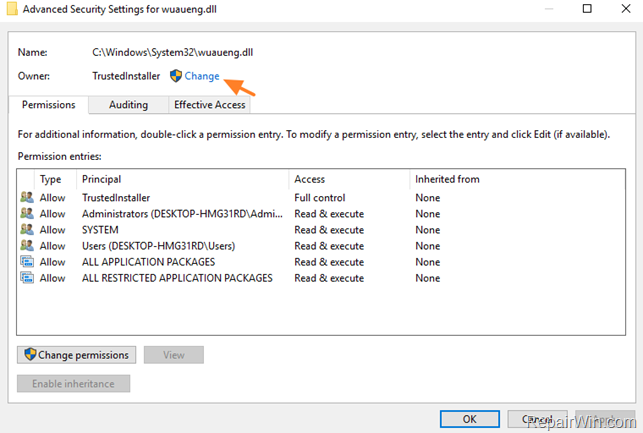
4. Click Change Owner.
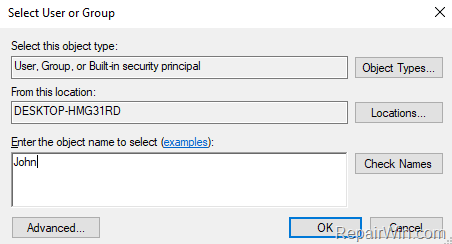
5. Type your account name and click OK.
6. Click Apply and OK again at ‘Windows Security’ information message.
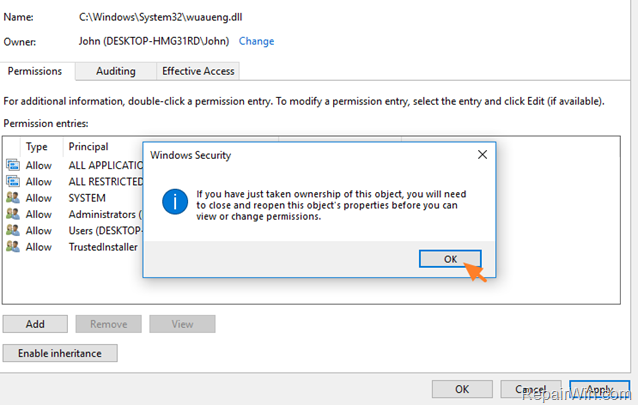
7. Click OK twice to close the all windows.
8. Reopen the ‘Advanced security settings’
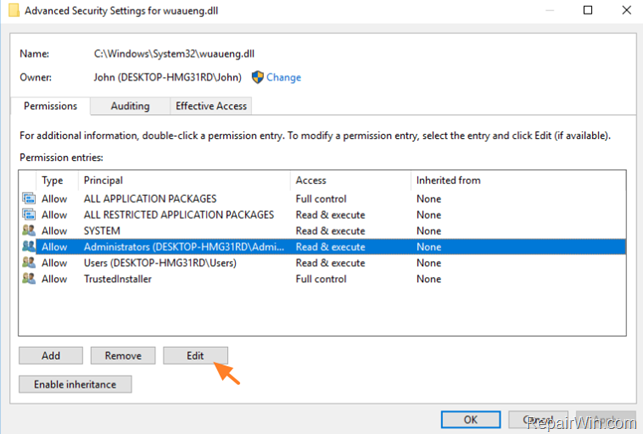
9. Highlight the Administrators group and click Edit.
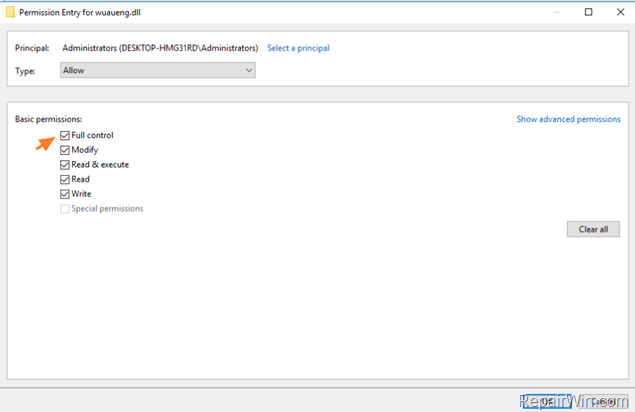
10. Check the Full Control checkbox and click OK twice.
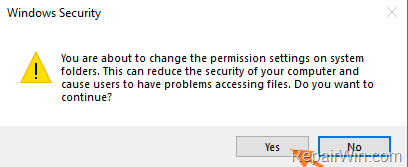
11. Click Yes as ‘Windows Security’ warning message and then click OK to close all windows.
12. Now proceed and rename the wuaueng.dll file to wuaueng1.dll
13. Restart your computer.
* Note: If you want to download and install updates in the future, just rename the “wuaueng1.dll” file back to its original name “wuaueng.dll” .
Method 4. Block Windows 10 Update by using a program.
If you ‘re looking for an easy way to stop updates in Windows 10, then you can use the portable StopWinUpdates utility from majorgeeks.com.
1. Download StopWinUpdates utility from http://m.majorgeeks.com/files/details/stopwinupdates.html
2. After downloading, decompress the zip file and run the ‘StopWinUpdates v2.5’ application from the extracted folder.
3. Review the default installation settings (or change them according your needs) and click Next.
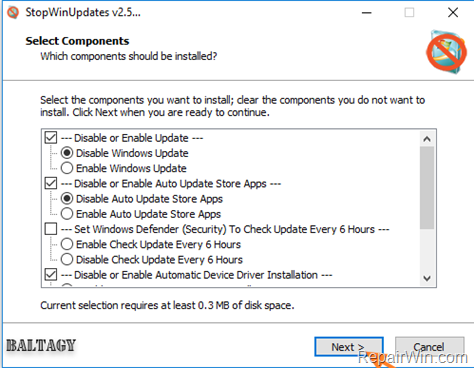
4. When the installation is completed, restart your computer. *
* Note: To re-enable the automatic update, just run the program again and Enable the Windows Update from program’s options.
Method 5. Disable Automatic Update by using Group Policy Editor in Windows 10 Pro/Enterprise/Education.
In Windows 10 Professional, Enterprise or Education editions, you can stop the automatic update from Group Policy Editor. To do that:
1. Press simultaneously the Windows ![]() + R keys to open the run command box.
+ R keys to open the run command box.
2. Type gpedit.msc & Press Enter.
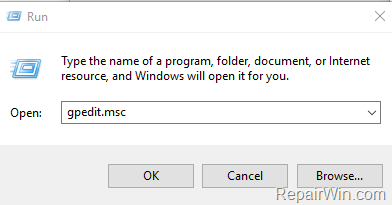
3. At the left pane navigate to:
- Computer Configuration -> Administrative Templates -> Windows Components -> Windows Update.
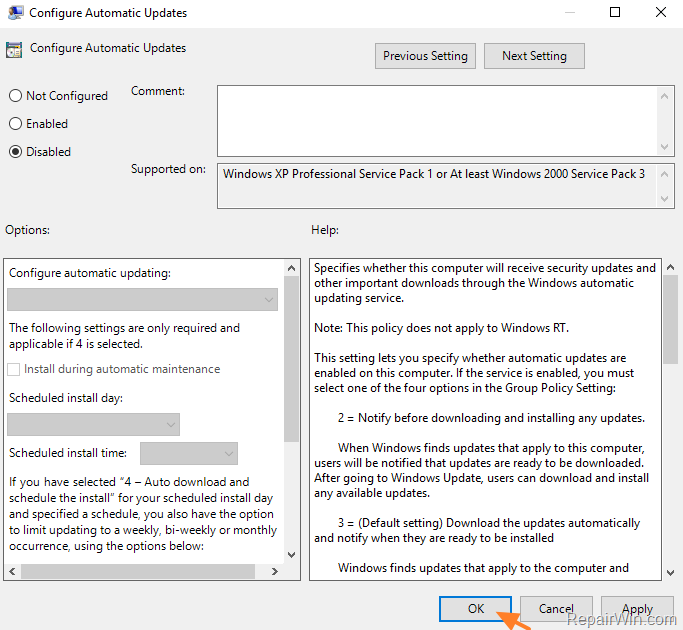
4. At the right pane, open Configure Automatic Updates.
5. Check Disabled and click OK. *
* Notes: By choosing the ‘Disabled’ option, any updates that are available on Windows Update servers can be downloaded and installed manually from Settings > Update and Security > Check for Updates. If you want to completely remove the ability from all users to download and install updates then proceed bellow.
6. Open the Specify Intranet Microsoft update service location policy.
7. Click Enabled and then type “http:\nowindowsupdate.local” at the ‘intranet update service address’ and the ‘intranet statistics server’ boxes and then click OK.
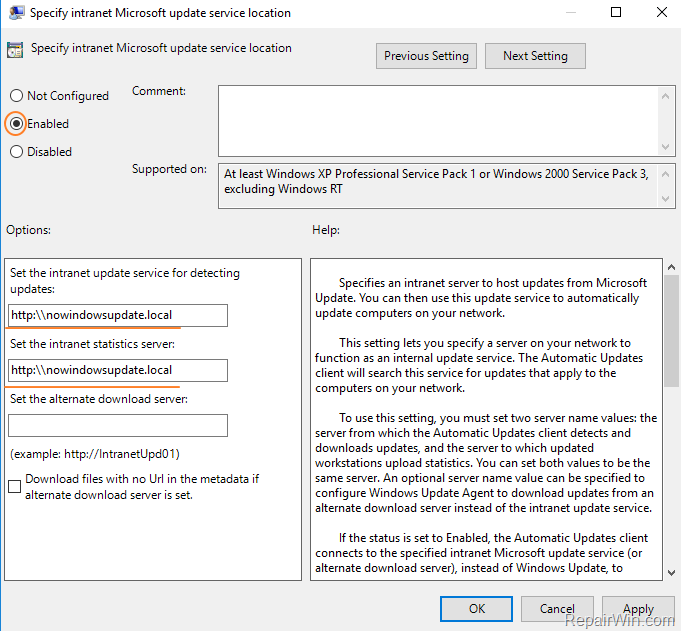
8. From now on, when you manually check for updates you will receive this message: “We couldn’t connect to the update service. We’ll try again later, or you can check now. If it still doesn’t work, make sure you’re connected to the Internet.” *
* Note: If you want to update Windows 10 in the feature, open Group Policy Editor and set the “Specify Intranet Microsoft update service location’ to “Not Configured” .
Method 6. Pause Updates from being installed in Windows 10 Pro/Enterprise/Education.
If you own a Windows 10 Professional, Enterprise or Education edition, then you can temporarily pause updates from being installed for up to 35 days. To do that:
1. From the Start ![]() menu choose Settings
menu choose Settings ![]() and then click Update & Security.
and then click Update & Security.
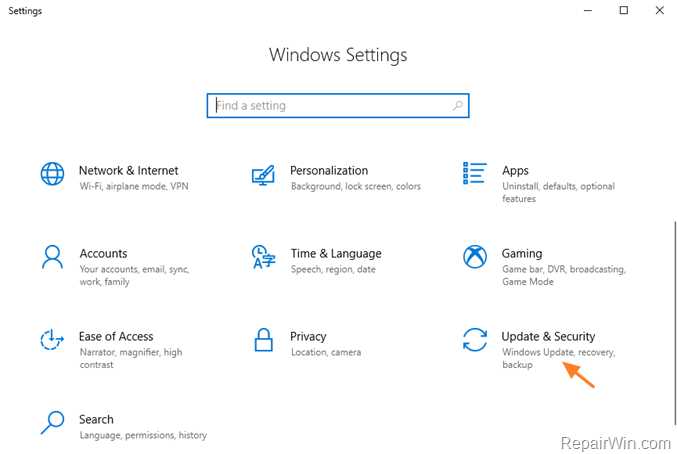
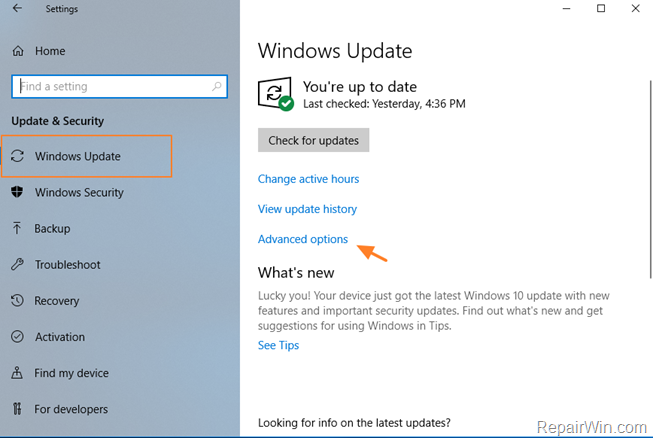
2. Click Windows Update on the left and then click Advanced options.
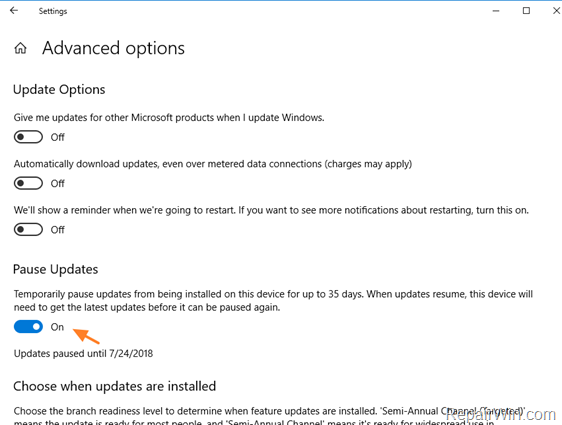
3. At Pause Updates section set the switch to ON, to pause the installation of updates for 35 days. After this period Windows will check and install the available updates, before let you to pause the updates again.
Method 7. Defer the installation of Feature Updates in Windows 10 Pro/Enterprise/Education.
“Feature Updates” in Windows 10, are like the Service Packs in previous versions of Windows. In fact, the “Feature updates” for Windows 10, are “big” updates that includes all the new features and improvements that has released for the operating system.
The “Feature updates” are released twice a year (in March and September) and in many cases causes problems to Windows 10 functionality and stability. For that reason, its better to postpone the “Feature update” installation for a while, until Microsoft fixes all the possible bugs that exists in the first release (of the “Feature Update”).
To defer the “Feature Updates” in Windows 10 Professional, Enterprise & Education Editions:
1. From the Start ![]() menu choose Settings
menu choose Settings ![]() and then click Update & Security.
and then click Update & Security.
2. Click Windows Update on the left and then click Advanced options.
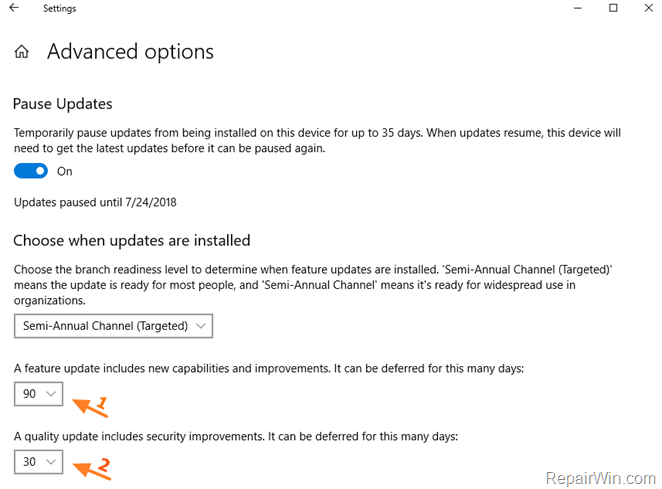
3. At Choose when updates installed section:
1. Specify for how many days (1-365 days) you want to defer the feature updates.
2. Specify for how many days (1-30 days) you want to postpone the quality updates.
That’s all folks! Did it work for you?
Please leave a comment in the comment section below or even better: like and share this blog post in the social networks to help spread the word about this solution.

