On a Windows 10, 8 or 7 based computer the following BSOD error may appear: “DPC_WATCHDOG_VIOLATION”. The blue screen problem “DPC WATCHDOG VIOLATION” commonly occurred occasionally, even if the system is idle and commonly is caused from an invalid or damaged device driver and in some other cases is related to hardware problems especially with the Graphics card.
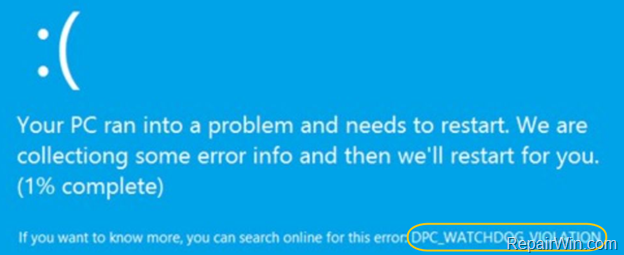
This troubleshooting guide contains several methods to resolve the DPC WATCHDOG VIOLATION BSOD problem on Windows 10, 8/8.1 or 7 OS.
How to FIX DPC WATCHDOG VIOLATION BoSD Problem on Windows 10/8/7.
The Blue screen problem DPC WATCHDOG VIOLATION may caused for several reasons e.g. faulty device or software drivers, damaged RAM or Disk drive, etc. So, in order to resolve the “DPC WATCHDOG VIOLATION” BSOD issue, follow the steps below:
Method 1. Scan your system for Viruses and Malware.
The first step to resolve the “DPC WATCHDOG VIOLATION” blue screen problem, is to ensure that your system is virus/malware free. For that task follow the instructions in this guide: How To Scan Your Computer for Viruses and other Malicious Programs.
Method 2. Uninstall your Antivirus/Security Software.
The “DPC WATCHDOG VIOLATION” blue screen problem, may caused after the automatic update of your Antivirus/Security program (especially if you ‘re using AVAST or AVG). So, proceed and completely uninstall your antivirus program from your system and restart your computer.
– If the BSOD problem, doesn’t occur after antivirus removal, then proceed to download and re-install the latest version of your security software on your system.
Method 3. Start Windows in Clean Boot State.
The next method, to resolve the “DPC WATCHDOG VIOLATION” BSOD problem, is to start Windows in a “clean boot” state, in order to identify which program causes your system to crash.
To start Windows in Clean Boot state:
1. Press the Windows ![]() + R keys to open the run command box.
+ R keys to open the run command box.
2. Type msconfig and press Enter.
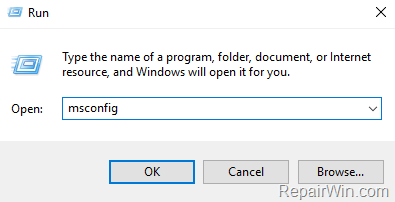
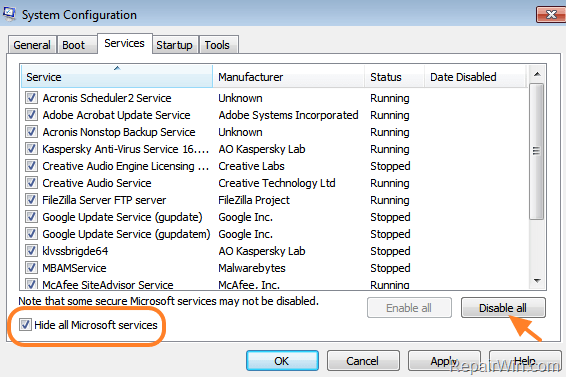
3. At Services tab, Hide all Microsoft Services checkbox and then press the Disable All button, to prevent all non Microsoft services from starting at Windows startup.
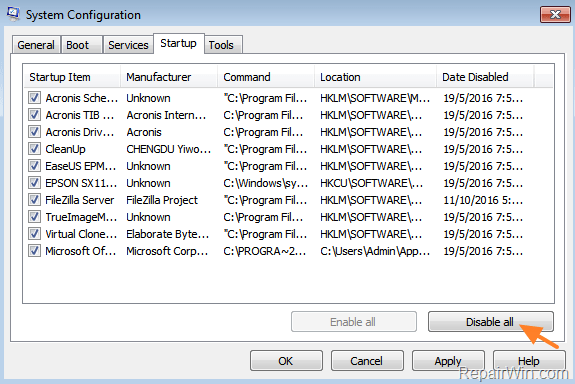
4. Then select the Startup tab and Disable all other programs which starting during Windows startup and run on the background. *
* Note: On Windows 10 or 8, select Open Task Manager in order to disable the startup programs.
5. When done, click OK and Restart your computer.
6. If after restarting, your computer is working fine and without BSOD problems, then launch the System Configuration utility again and enable one by one all the disabled items and restart your system, until you find out which one causes the BSoD problem. *
* Note: To exit from Clean Boot state, launch the System Configuration utility and at the General Tab choose Normal startup.
Method 4. Check Memory (RAM) and Hard Disk (HDD) for problems.
Blue Screen Problems, may be due to a damaged RAM module or a bad hard drive. To test and diagnose your RAM and HDD components for problems, follow the instructions in these guides:
- How to Diagnose Computer Memory problems with Memtest86+
- Best Hard Drive Test & Diagnostic Tools to Check Hard Disk’s Health
Method 5. Update Display & Network Drivers.
In some cases, the BSOD issue “DPC WATCHDOG VIOLATION”, occurs because of an invalid or corrupted device driver. So, proceed and update the drivers of the following devices on your computer: *
1. Graphics Adapter (VGA).
2. Ethernet Adapter & Wi-Fi adapter (if exists).
* Notes:
1. if the BSOD problem persists, after updating the above drivers, then proceed and update all other drivers on your system (Chipset, Audio drivers, etc.).
2. In some cases the “DPC_WATCHDOG_VIOLATION” error may occur if you have a Solid State Drive (SSD). So, if you own an SSD drive, proceed and update the firmware on the drive. For instructions on how update the SSD firmware, look at your SSD manufacturer’s website.
Method 6. Update iaStor.sys Driver.
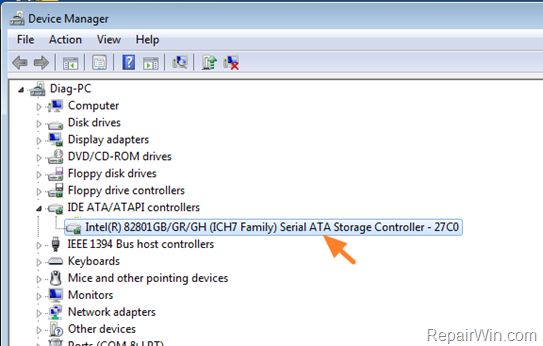
1. Navigate to Device Manager.
2. Expand IDE ATA/ATAPI Controllers.
3. Double click at SATA/AHCI Controller.
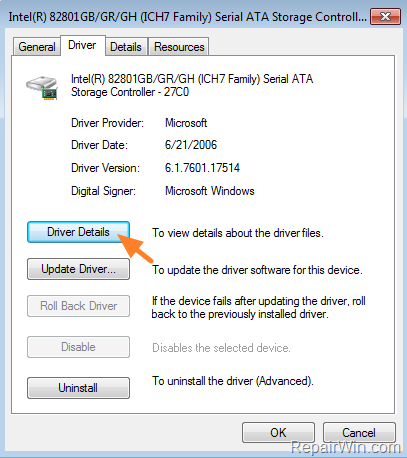
3. Select the Driver tab and click Driver Details.
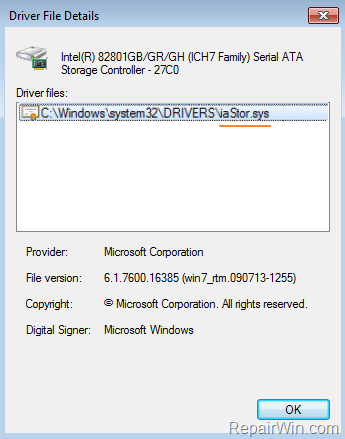
4. If you ‘re using the iaStor.sys driver, then click OK and proceed to change the driver as mentioned below, otherwise skip the rest steps.
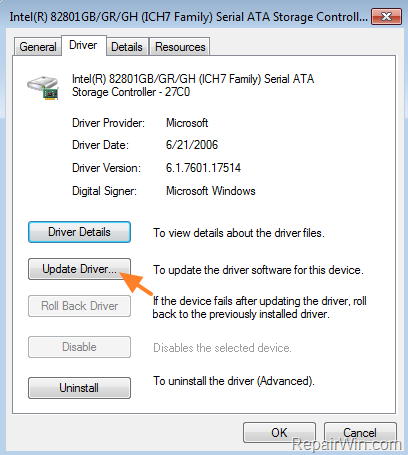
6. Click Update Driver.
7. Select Browse my computer for driver software.
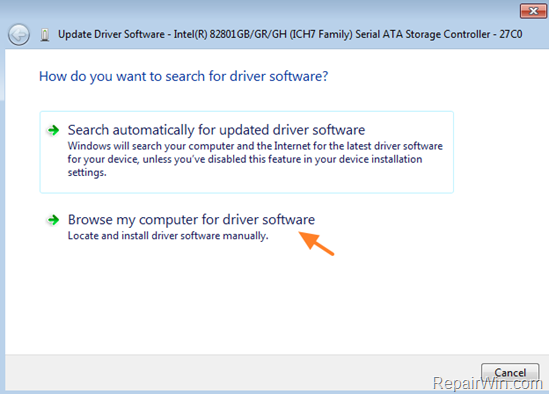
8. Click Let me pick from a list of device drivers on my computer.
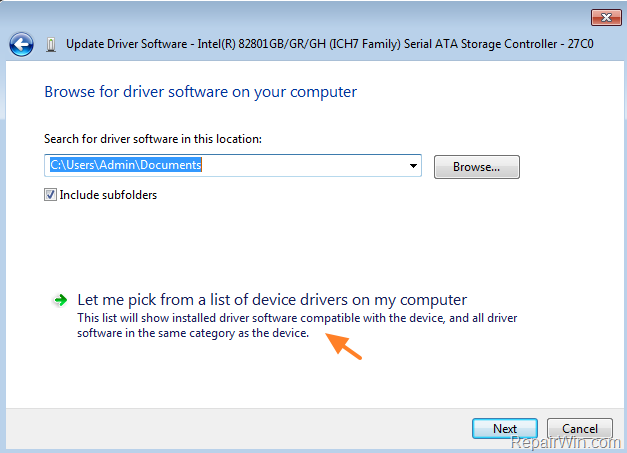
9. Highlight the Standard SATA AHCI Controller and click Next.
10. When the driver installation is completed, close all open windows and restart your computer.
Method 7. Analyze Minidump.
When Windows crashes with a blue screen, stores the details of the BSoD screen to small file(s), which called “MiniDump“. The analysis of the Minidump file(s) can help you to troubleshoot and resolve the blue screen problem. To accomplish this task follow the instructions in this article: How to Analyze MiniDump Files with BlueScreenView.
That’s all! Did it work for you?
Please leave a comment in the comment section below or even better: like and share this blog post in the social networks to help spread the word about this solution.

