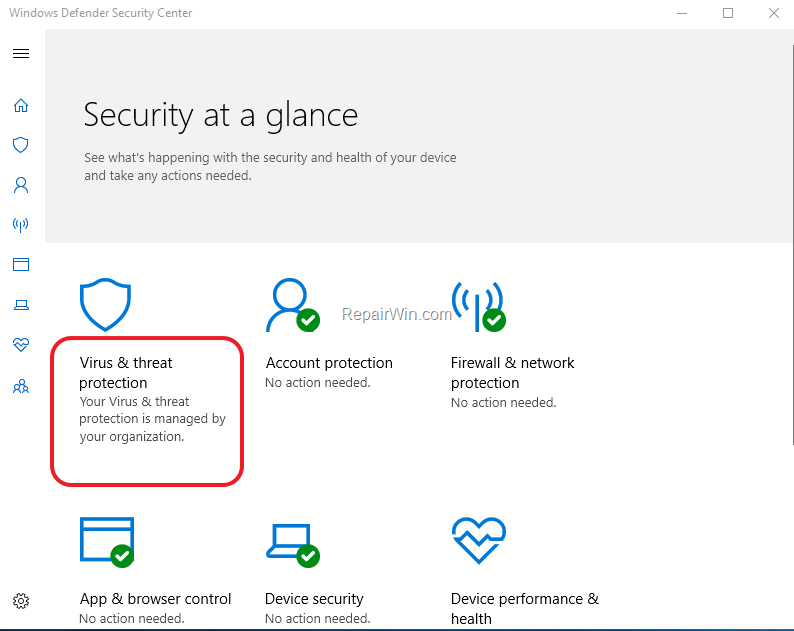
This tutorial contains instructions to resolve the following problem in Windows Defender Security Center: “Your Virus and threat protection is managed by your organization” in Windows 10 OS.
The Windows Defender messages (errors): “Your Virus & threat protection is managed by your organization”, “Some settings are managed by your organization” &
“Real time protection is managed by your administrator”, commonly appears on business computers where the Antivirus Protection is managed by the domain Administrator. If the computer, doesn’t belong to a Domain, then the above error(s) appear after installing a third-party antivirus, or after a virus attack.
How to FIX: Your Virus & threat protection is managed by your organization in Windows 10.
Step 1. Uninstall Any Other Non-Microsoft Antivirus.
The first step to resolve the Windows Defender error “Virus and threat protection is managed by your organization” is to uninstall any other third-party antivirus (e.g. Avast, MacAfee, MalwareBytes, etc.) from your system.
Step 2. Scan your system for Viruses and Malware.
The second step to resolve the Windows Defender error “Some settings are managed by your organization”, is to ensure that your system is virus/malware free. For that task follow the instructions in this guide: How To Scan Your Computer for Viruses and other Malicious Programs.
Step 3. Restore Windows Defender Settings to Default Values.
Proceed and enable the Real Time Protection in Windows Defender, by using one of methods below:
Method 1. Turn ON Defender Antivirus Protection in Registry.
1. Open Registry Editor: To do that:
2.. Navigate to the following key at the left pane:
- HKEY_LOCAL_MACHINESOFTWAREPoliciesMicrosoftWindows Defender
3. At the right pane, double click at DisableAntiSpyware REG_DWORD value and change the value data from 1 to 0.
4. Click OK and close Registry editor.
5. Restart your PC. Normally after restarting, Windows Defender should be enabled. *
* Note: If after restarting your PC the Windows Defender is still disabled, with status “Your Virus & threat protection is managed by your organization”, proceed and modify the
Start REG_DWORD value from 4 to 2 at the following registry keys:
- HKEY_LOCAL_MACHINESYSTEMCurrentControlSetServicesSecurityHealthService
- HKEY_LOCAL_MACHINESYSTEMCurrentControlSetServicesWinDefend
- HKEY_LOCAL_MACHINESYSTEMCurrentControlSetServicesWdNisSvc
- HKEY_LOCAL_MACHINESYSTEMCurrentControlSetServicesMpsSvc
Method 2. Delete the DisableAntiSpyware Registry Value from Command Prompt.
1. Open Command Prompt as Administrator. To do that:
- At the search box type: command prompt or cmd
- Right-click at cmd or Command Prompt result and select Run As Administrator.
2. In Command prompt type (Copy/Paste) the following command and press Enter:
- REG DELETE “HKLMSOFTWAREPoliciesMicrosoftWindows Defender” /v DisableAntiSpyware
3. Then press Y to confirm your decision.
4. Close command prompt and restart your computer.
Method 3. Turn ON Windows Defender Real Time Protection in Group Policy.
If you own Windows 10 Professional, Enterprise or Education edition, then proceed and enable the Windows Defender Antivirus protections in Group Policy. To do that:
1. Press simultaneously the Windows ![]() + R keys to open the run command box.
+ R keys to open the run command box.
2. Type gpedit.msc & Press Enter.
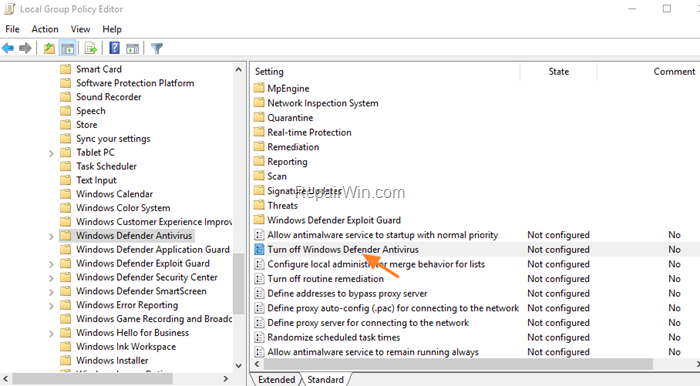
3. At the left pane navigate to:
- Computer ConfigurationAdministrative TemplatesWindows ComponentsWindows Defender Antivirus
4. At the right pane open the Turn off Windows Defender Antivirus setting.
5. Set the policy setting to Not Configured or Disabled to enable the real time protection and click OK.
6. Restart the computer.
That’s all folks! Did it work for you?
Please leave a comment in the comment section below or even better: like and share this blog post in the social networks to help spread the word about this problem.


