Several users complain that they are unable to update their system to the latest version of Windows 11, version 22H2, because the update fails to install with error 0x8007000d. The error code “0x8007000d” in the Windows 11 v122H2 update is usually caused because of corrupted downloaded files or because of a non-compliant device driver or software.
This guide, contains step by step instructions to resolve the error 0x8007000d in Windows 11 22H2 update installation: “We couldn’t install this update, but you can try again. Error Code (0x8007000d).
How to fix error 0x8007000d on Windows 11 22H2 Update.
Important Prerequisites before installing the Windows 11 22H2 Update.
1. Disable or (better), temporarily uninstall your Security/Antivirus software and reinstall it after the update installation has completed.
2. Make sure that you have at least 32GB free disk space. To free up disk space use Disk Cleanup.
3. Disconnect all USB devices & SD Cards (e.g. USB Flash Disks, the USB Wireless receiver for you mouse or keyboard, etc.).
4. Disable Device/Hard Drive Encryption (If enabled).
Method 1. FIX Windows 11 22H2 Update Error 0x8007000d by Removing NVIDIA Graphics Drivers.
Some users reported that after uninstalling the NVIDIA Control Panel and the GeForce Experience drivers, the Windows 11 22h2 update installed without any issue. To try that: *
* Note: This method only applies to NVIDIA graphics owners.
1. Press Windows ![]()
![]() + R keys to open the Run command box.
+ R keys to open the Run command box.
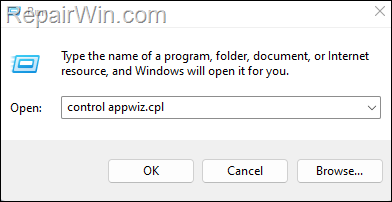
2. Type control appwiz.cpl and press OK (or Enter) to launch Programs and Features.

3. Now proceed and uninstall all NVIDIA’s software. (e.g. NVIDIA Graphics Driver, NVIDIA Control Panel, GeForce Experience, etc.)
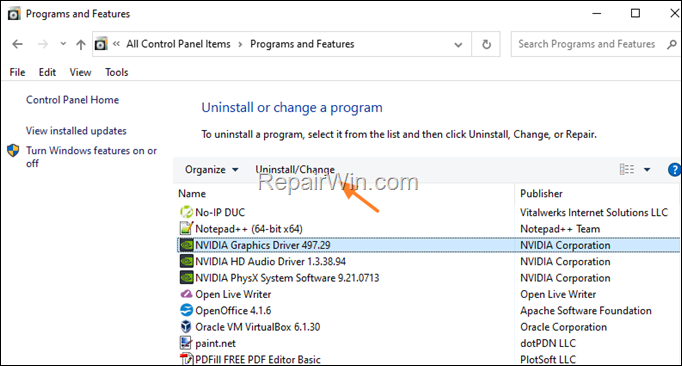

4. Restart the PC and try to install the update. If the installation is successful, proceed to reinstall the latest NVIDIA drivers and software for your graphics card.
* Note: if the update 22H2 fail to install again, then proceed to next method, before installing the latest NVIDIA drivers.
Method 2. Delete the ‘SoftwareDistribution’ Folder.
The “C:WindowsSoftwareDistribution“ folder, is the location where Windows store the Windows Updates. Many times, this folder becomes corrupted and you must re-create it in order to download the updates from scratch. To rebuild (re-create) the “SoftwareDistribution” folder follow the steps below:
Step 1: Stop Windows Update Service.
1. Open Windows Services control panel: To do that:
- Press Windows

 + R keys to open the run command box.
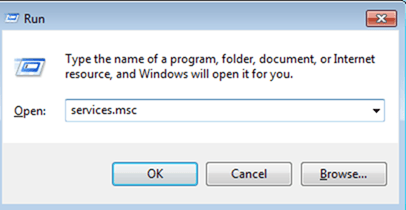
 - In the Search box, type: services.msc & click OK.
- (Accept the UAC warning if appears).

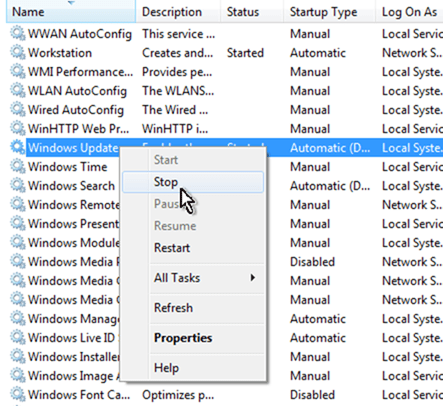
2. In Services control panel locate the “Windows Update” service.
3. Right-click on Windows Update service and select “Stop”.

Step 2: Delete the SoftwareDistribution folder.
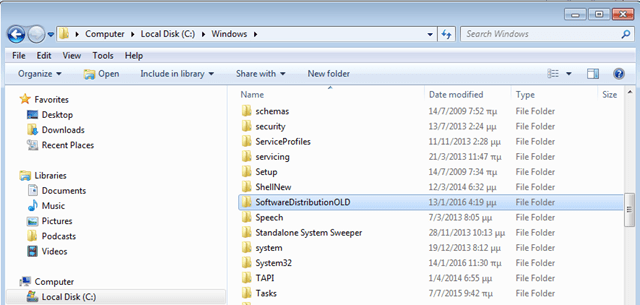
1. Open Windows Explorer and navigate to: C:Windows folder.
2. Find and Delete the “SoftwareDistribution” folder (or rename it. e.g. to “SoftwareDistributionOLD”) .

Step 3: Start the Windows Update Service.
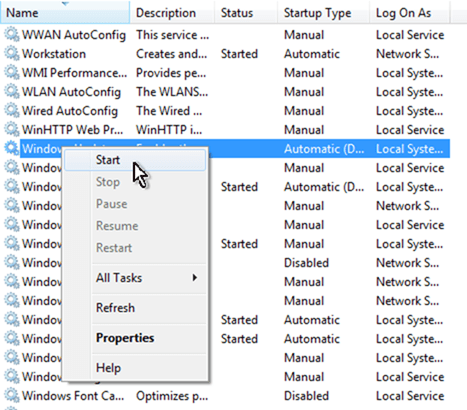
1. Open Windows Services control panel.
2. Right-click on Windows Update service and select “Start”.

Step 4: Check and Install Windows 11 Update.
1. Navigate to Start -> Settings -> Windows Update and click Check for Updates.
Method 3. Update to Windows 11 22H2 by using the Update Assistant.
1. Navigate to Windows 11 download site and click download the Windows 11 Installation Assistant.


2. Double click at the downloaded file and click the Accept and install button to begin the installation.
3. Finally, click Update Now to install the latest version of Windows 11 on your computer.
That’s all folks! Did it work for you?
Please leave a comment in the comment section below or even better: like and share this blog post in the social networks to help spread the word about this solution.


