The on-screen keyboard (aka “virtual keyboard”), allows you to type characters and text using only your mouse or finger on touchscreen systems. Especially when you have a laptop with a touchscreen, typing with your finger or pen on the touch keyboard is more easier than typing on the physical keyboard.
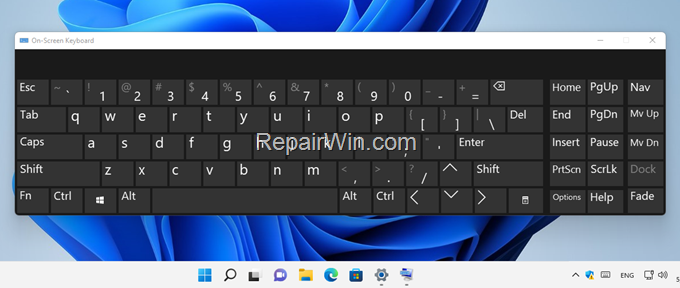

This article contains instructions on how to activate or disable the on-screen keyboard on Windows 11. More especially you’ll learn the following:
- How to open the On-Screen Keyboard in the Login Screen.
- How to enable and open the On-Screen keyboard in Windows 10/11.
- How to show or hide the Virtual Keyboard icon in the Taskbar.
- How to enable or disable On-Screen keyboard at Windows startup.
- How to disable on-screen keyboard on Windows.
- How to Disable Touch keyboard icon.
How to Open or Disable the On-Screen keyboard on Windows 11.
If your computer comes with the Windows 11 operating system or if you’ve upgraded to Windows 11 from Windows 10, follow one of the following methods to turn on/off or off the virtual keyboard:
1. Open On-Screen Keyboard at Login Screen.
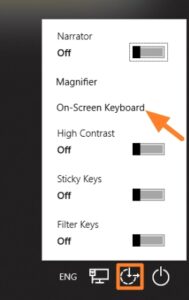
If you physical keyboard is not working and you want to type your password in the Windows 10/11 login screen, click the Ease of Access icon ![]()
![]() on the bottom right corner of the login screen and open the On-Screen Keyboard:
on the bottom right corner of the login screen and open the On-Screen Keyboard:

2. Turn On-Screen keyboard in Accessibility settings.*
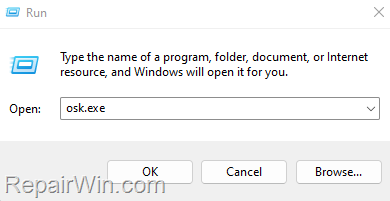
* Note: If you own a physical keyboard, press the CTRL + Windows + O keys to open the on-screen keyboard, or type osk.exe in the Run dialog.

To open/enable the On-Screen keyboard in Windows 11 settings:
1. From the Start menu ![]()
![]() go to Settings
go to Settings ![]()
![]() .
.
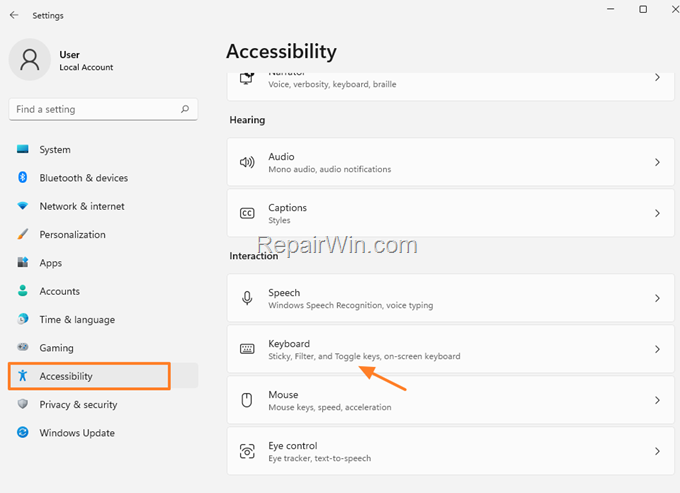
2. Select Accessibility on the left, and at the right scroll down and open keyboard under the Interaction section.

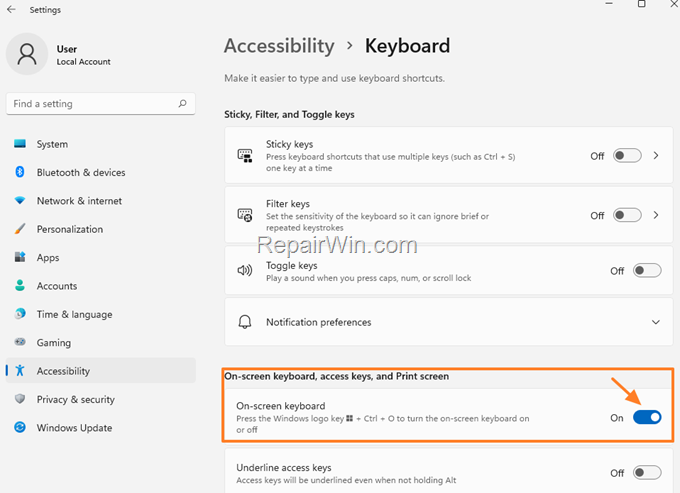
3. Drag the On-screen keyboard toggle to ON to open the virtual keyboard. *
* Note: To close the on-screen keyboard on Windows 11, just set the On-screen keyboard toggle to OFF or just hit the X button on the upper right of its window to close it.

3. Show the Touch Keyboard icon in Taskbar .
The 2nd method to open the on-screen keyboard in Windows 11, is by using the Virtual keyboard icon on the taskbar:
To show the Touch keyboard icon in the taskbar:
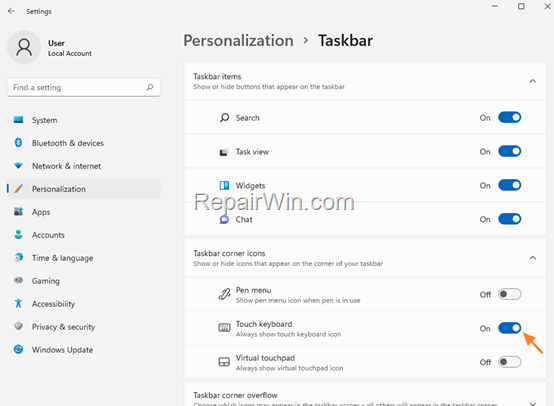
1. Right-click on the Taskbar and open Taskbar settings. (or, go to Settings > Personalization > Taskbar).


2. To enable the Virtual Keyboard icon on Windows 11 taskbar, set the Touch keyboard toggle to ON. *
* Note: To hide the Virtual keyboard icon from the taskbar, just set the Touch keyboard to OFF. To prevent users to open the Virtual Keyboard from the Touch Keyboard icon, read the instructions in method 4.

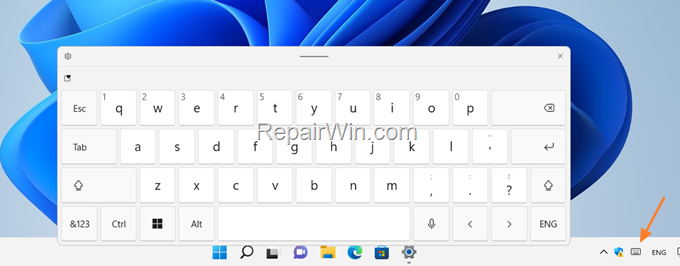
3. After enabling the on-screen keyboard, you’ll see a new icon on the taskbar for the virtual keyboard. Just press it to open the on-screen keyboard.

4. How to Enable or Disable On-Screen Keyboard at Startup.
If you want On-Screen Keyboard to automatically open at startup/sign-in: *
* Note: The following instructions apply to both Windows 10 and Windows 11.
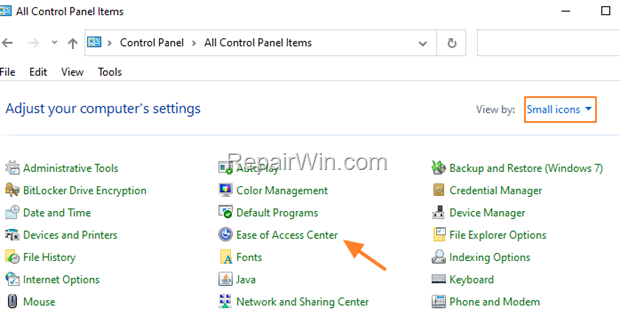
1. Navigate to Control Panel, change the View by to Small icons to view all control panel items, and then open the Ease of access Center.

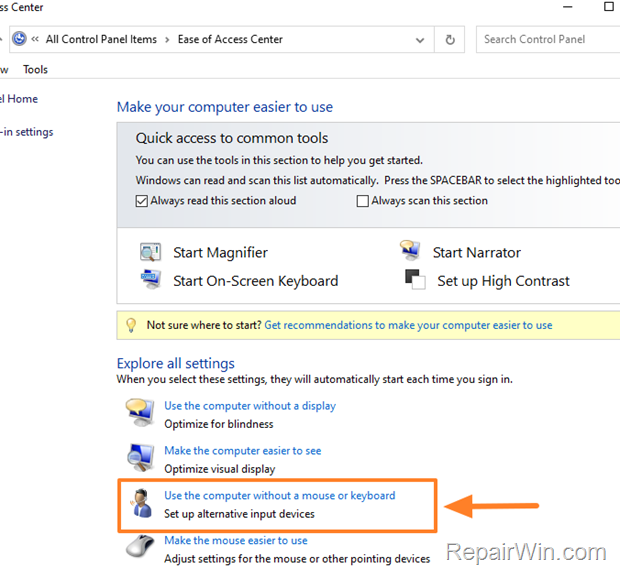
2. Click Use the computer without a mouse or keyboard.

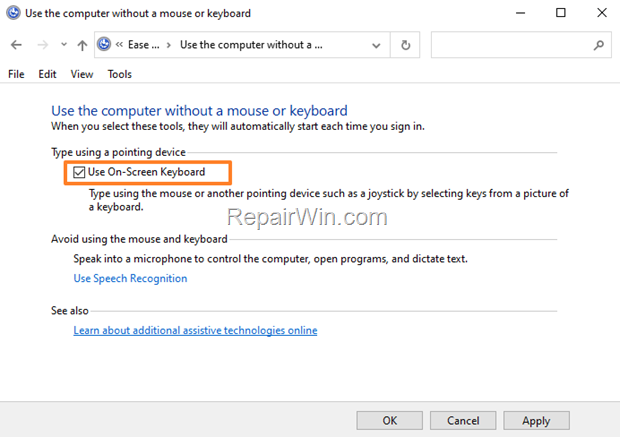
3. Check the Use On-Screen keyboard option, if you want the On-Screen keyboard to open at Windows startup, otherwise untick this box to disable the on-screen keyboard at startup/sign-in.

5. Disable On-Screen Keyboard in Windows 11.
To totally prevent users to open the Virtual Keyboard in Windows 10/11*, proceed and rename the On-Screen keyboard application (OSK.EXE), as follows:
* e.g. By typing “osk.exe” in the run dialog box or by using the CTRL + WINDOWS + O shortcut:
1. Navigate to C:WindowsSystem32
2. Right-click at osk.exe file (application) and choose Properties.
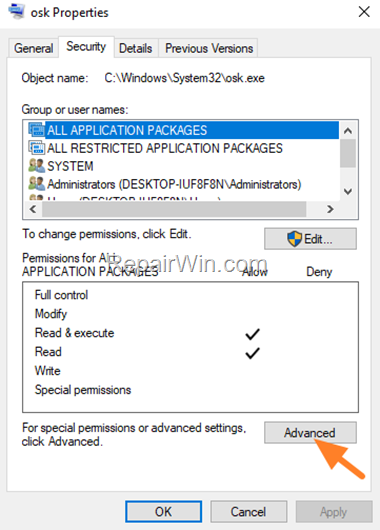
3. At Security tab, click Advanced.

4. Click Change Owner.
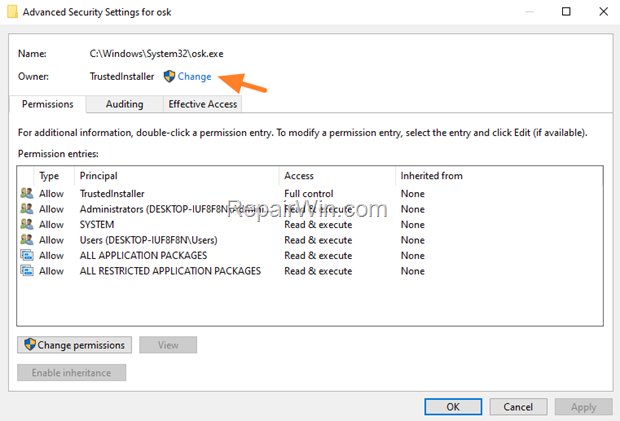

5. Type the name of your admin account and click OK.
6. Hit OK three times to close the Properties of the osk file.
7. Right-click again on the osk file and re-open Properties.
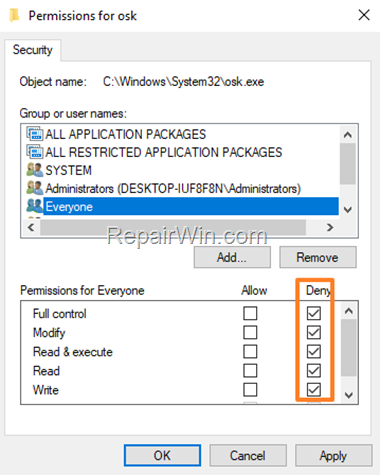
8. At Security tab select Edit and then click Add.
9. Type Everyone for username and click OK.
10. Select the Everyone from the list and click Deny (Full Control).
11. Click OK twice to apply the change.

6. Disable On-Screen Keyboard in Services.
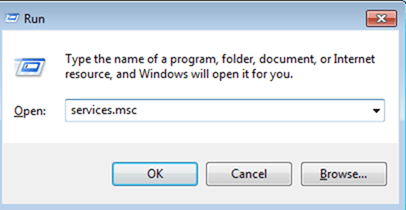
1. Press Windows ![]()
![]() + R keys to open the run command box.
+ R keys to open the run command box.
2. Type: services.msc and press Enter. (Accept the UAC warning if appears).

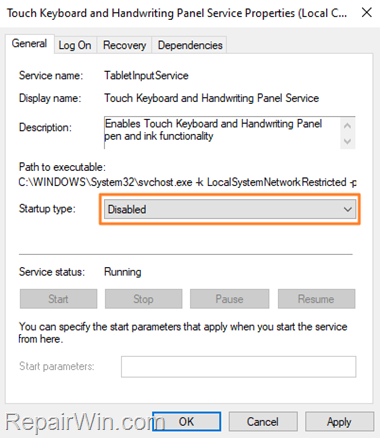
3. double-click at Touch Keyboard and Handwriting Panel Service to open its properties.
4. Set the Startup type to Disabled and restart your PC.

That’s all folks! Did it work for you?
Please leave a comment in the comment section below or even better: like and share this blog post in the social networks to help spread the word about this solution.


