If you receive the error Code 80070490 or 80073712 during SP1 or in other Windows update installation then probably Windows system files are corrupted. Error Code 80070490 is received whenever a user tries to install SP1 (manual or through Windows Update) on a Windows Vista (or a Windows 7) based computer and the error Code: 0x80073712″ is received during installation of KB979306 Windows update at the same computer.
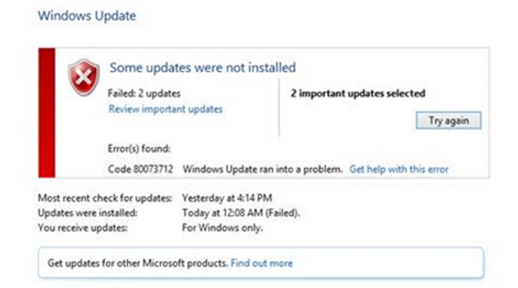
After trying different suggestions found online, finally I was able to bypass and resolve the errors 80070490 & 0x80073712 in Windows update KB979306 & Windows SP1 installation.
How to fix error 80070490 & 80073712 during installation of Windows Update KB979306 or SP1.
Suggestion: Before proceed to solutions below, first make sure that you have installed all available drivers on your computer. (Applied to Clean installations only).
Solution 1. Exclude KB979306 update from installation.
{This solution is worked on a Windows Vista machine, with both error codes (80070490 & 80073712) received}
1. Navigate to Windows Update panel and Check for Updates.
2. When the search is completed, select all other available updates that found but exclude (uncheck) the “KB979306” (and the SP1) from installation.
3. When done, click the Install Updates button, and leave Windows to install all other updates (except KB979306 & SP1).
4. When done, restart you computer (if needed) and then check for updates again.
5. Perform the same steps and Install all other updates found, except the KB979306 & SP1 updates.
6. When finish and the KB979306 update is the only available update for installation, then proceed and install it.
7. Normally now, the KB979306 update installation will be succeed.!!!
8. Finally proceed to check and install all other available updates including the SP1.
Solution 2. Repair Windows System Files.
Open an elevated command prompt and execute the ‘sfc /scannow’ command to repair system files. To do that:
1. Go to Start > All Programs > Accessories.
2. Right-click at Command Prompt and click Run As Administrator.
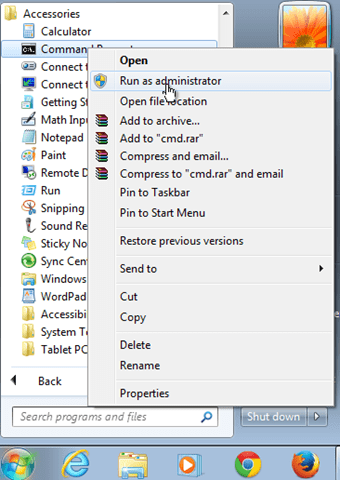
(Ask Yes at User Account Control (UAC) warning message)
3. In command prompt window type: sfc /scannow & press Enter.

4. Now wait until the System File Checker repairs the Windows System Files.
5. When this done, restart your computer.
6. Try to install the KB979306 update or the SP1.
Solution 3. Run the System Update Readiness tool.
1. Download and run the System Update Readiness tool according to your Windows version.
2. When the installation is completed restart your computer and try to install updates,
Solution 4. “Rebuild” the SoftwareDistribution folder.
The SoftwareDistribution folder (C:WindowsSoftwareDistribution), is the location where Windows store the Windows Updates. Some times this folder is corrupted and you have to re-create it, in order to download and install updates from scratch. To rebuild (re-create) the “SoftwareDistribution” folder follow the steps below:
Step 1: Stop Windows Update Service.
1. Open Windows Services control panel: To do that:
- Press Windows
 + R keys to open the run command box.
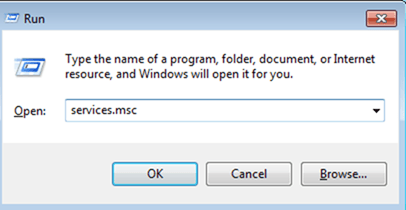
 - In the Search box, type: services.msc & click OK.
- (Accept the UAC warning if appears).
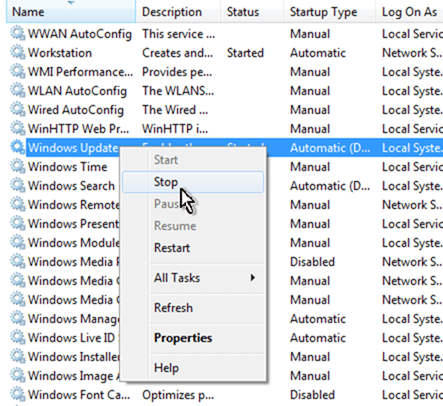
2. In Services control panel locate the Windows Update service.
3. Right-click on Windows Update service and select “Stop”.
Step 2: Delete SoftwareDistribution folder.
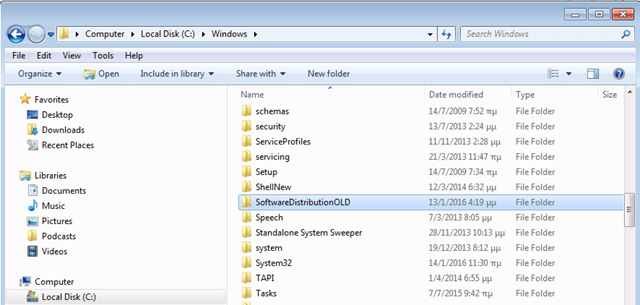
1. Open Windows Explorer and navigate to: C:Windows folder.
2. Find and Delete the “SoftwareDistribution” folder (or rename it. e.g. to “SoftwareDistributionOLD”) .
Step 3: Start Windows Update Service.
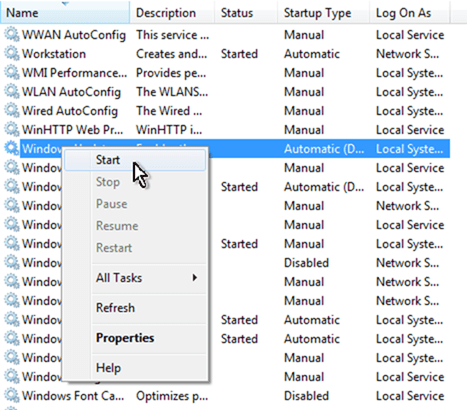
1. Now go back to Windows Services control panel:
2. Right-click on Windows Update service and select “Start”.
3. Try to check for Updates again.
That’s all folks! Did it work for you?
Please leave a comment in the comment section below or even better: like and share this blog post in the social networks to help spread the word about this solution.

