.single .post-author, .post-date {
text-transform: none;
}
,
Last updated: July 10th, 2024
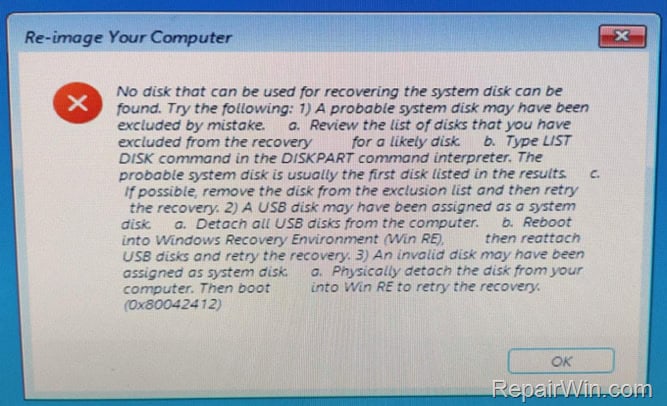
If the “System Image Restore failed” and you can’t restore your computer because of error “No Disk that can be used for recovering the system disk can be found”, continue reading below to fix the problem.
The “System image restore failed” errors 0x80070057 and 0x80042412 usually occur because the disk you are trying to restore to (the destination/target disk) is not empty or it is already formatted (partitioned). In other cases the error occurs because the destination disk is unsuitable for the system restore or has a hardware problem.


In this guide you’ll find detailed steps to fix the error “No Disk that can be used for recovering the system disk can be found” in System Image Restore.
FIX: System image restore failed, No disk was found that can be used to recover the system disk on Windows 10/11.
Step 1. Ensure that Target Disk has Enough Storage Space.
To restore a system image to a new disk, the new disk must be at least the same size as the old disk. So before you go any further, make sure that the new (target) disk is at least the same size in Gigabytes (GB) as the original (source) disk where you took the system image. *
* Note: In some cases you may receive the mentioned error even if the target disk has the exact same size as the source (old) disk. Therefore, I recommend always using a larger sized disk to restore a system image.
Step 2. Clean the Target Disk.
Usually, the System image restore fails with “Cannot find a disk that can be used to recover the system disk” error when the destination/target disk is not empty (blank). To fix the problem erase the target disk, using DISKPART:
1. Boot from the USB Windows 10/11 Installation Media.
2. Click Next at ‘Language options and then select Repair your computer.
3. Then click Troubleshoot -> Command Prompt.


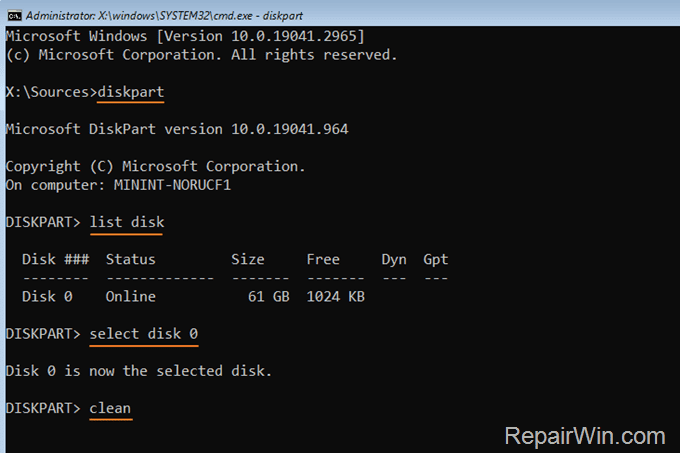
4. In command prompt give the following commands in order:
- diskpart
- list disk
5. Now notice the disk number of the target disk. (e.g. “0” in this example).*
* Note: If you try to restore the image to another computer and receive the error “There are no fixed disks to show” after giving the “list disk” command, read the instructions on Method-1 of this article: FIX: There Are No Fixed Disks To Show In DISKPART.
6. Then select the disk using the following command:*
- select disk X
* Note: Where X is the number of the target disk. For this example the command is:
- select disk 0
7. Now give the following command to CLEAN all the partitions on the disk:
- clean


8. When the operation is completed type exit to close DISKPART.
9. Close Command Prompt windows and then click Turn Off to shutdown the computer.
10. Turn on the PC again, boot from the USB Windows Installation Media and try to restore you computer from the system image. If you receive the same error again, do the following:
a. Shut down the computer.
b. Remove from the computer the old disk (if you haven’t already done so).
c. Enter in BIOS setup and ensure that the target disk is set as the Primary/First boot device.
d. If you try to restore the image to another computer, ensure that the target computer has the same BIOS type (Legacy or UEFI) as the old (source) computer.
e. Try to restore the system image and if the restore fails again, replace the target disk with a new bigger one. (I’ve encountered the mentioned error on a damaged disk as well).
That’s all folks! Did it work for you?
Please leave a comment in the comment section below or even better: like and share this blog post in the social networks to help spread the word about this problem.

- Author
- Recent Posts
- FIX: No Disk that can be used for recovering the system disk can be found in System Restore (Solved) – July 10, 2024
- FIX: There are no fixed disks to show in DISKPART (Solved) – July 3, 2024
- Cannot Print in Color in Excel. (Quick FIX) – June 26, 2024


