Several times I have helped friends and customers to resolve connection problems with their wireless network. In most cases the wireless connection problems are due to a wrong input of the password for the wireless network, a poor Wireless signal or to a switched off wireless adapter.
In other cases, however, and while everything seems to function properly, Windows still can not be joined to any wireless network for no apparent reason. (e.g the Wireless Adapter status is: “Device is Working properly”, but No Wireless Connections are available when you try to connect to a wireless network). During this behavior you may also see one of the following critical errors in Event Viewer:
- WLAN AutoConfig service cannot start – Error 1114
- WLAN Auto Config service on the local computer. Error 1068: The dependency service or group failed to start.
In this tutorial you can find detailed instructions on how to fix Wireless Connectivity problems problems on a Windows 8.1, 8 & Windows 7 based computer.
How to fix: No Wireless Connections Available – problem.
Nội dung
1. Look on your laptop for a hardware switch that can turn on or off the Wireless signal. In some laptops the wireless switch can be found on the special Function keys (e.g. Fn +F4, or Fn+F5, etc.) on your keyboard.
![]()
2. Ensure that the Wireless Adapter is Enabled.
Step 1. Enable Wireless Adapter in BIOS Setup.
Make sure that the wireless adapter is enabled in BIOS settings. To do that:
1. Restart your computer and press the corresponding key* to enter BIOS Setup.
* In most laptops you have to press the F2 or F10 key to enter BIOS Setup settings.
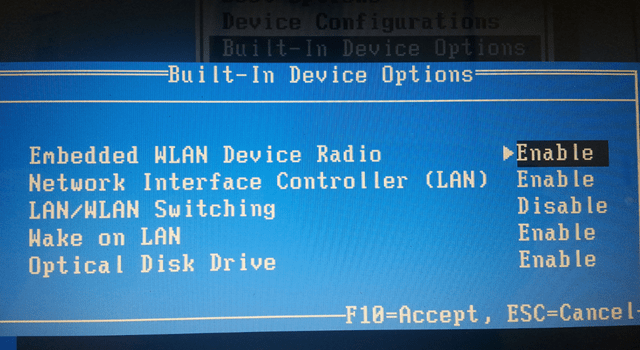
2. Look for the WLAN Device Radio (or a similar setting). *
* The WLAN Device setting(s), commonly can be found under System Configuration > Built-In Device Options
3. Set the WLAN Adapter setting to Enable.
Step 2. Enable Wireless Adapter in Windows environment.
Then make sure that the wireless adapter is Enabled inside Windows.
1. Open Windows Control Panel.
2. Click at View network status and tasks under Network and Internet category.

3. Click at Change adapter settings.
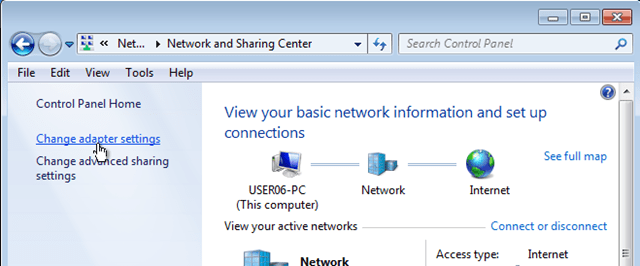
4. Right-click at the Wireless Connection and make sure that is Enabled. *
* If is already Enabled, try to Disable and Re-Enable the Wireless Adapter Connection.
5. Check now if you can connect to your Wireless network.
3. Restart your Wireless Router.
1. Unplug (or Power Off) your Wireless router. (I prefer to totally unplug the wireless router).
2. Wait for 20-30 seconds.
3. Plug the power cord back and turn on the router.
4. Wait until the router initializes the connections and its lights becomes stable.
5. Try to connect to your WiFi network.
Attention: Some Wireless Routers may have a Wireless Button on their body to turn On or Off the Wi-Fi signal. In that case, make sure that the Wireless button is set to ON.
4. Re-install Wireless Adapter drivers.
In some cases the Wireless device’s driver becomes corrupted, so proceed to remove and then re-install them from scratch/
Step 1. Navigate to Device Manager:
1. Simultaneously press Windows + R keys to open the RUN command window.
2. In “RUN” window “Open” box, type: devmgmt.msc
3. Press Enter.

Step 2. Uninstall the Wireless Adapter.
1. In Device Manager, expand Network Adapters.
2. Right-click on the Wireless Adapter and select Uninstall.
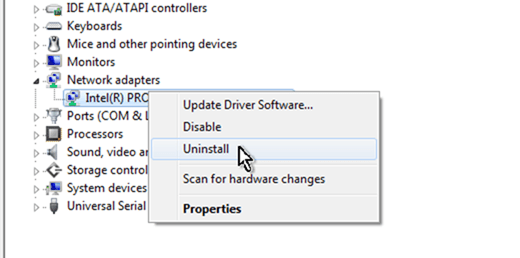
3. Restart your computer.
4. Re-Install the Wireless Adapter’s driver.
5. After installation try to connect to your WiFi network.
5. Repair Windows System Files.
If your system files are damaged (e.g. after a virus attack, power outage, etc.) then you may face problems when you try to connect to your WiFi network. In such cases Windows recognizes the Wireless Adapter without errors but when you proceed to connect to a WiFI network, you face a message says that “No Wireless Connections are available” with the following error in Event Viewer “WLAN AutoConfig cannot start – Error 1114“.
To repair Windows System files:
Step 1. Open an Elevated Command Prompt (with Administrative privileges).
To open a Command Prompt with Administrative Privileges:
In Windows 8 or 8.1:
- Right-click at the lower left corner and from the menu appears choose Command Prompt (Admin)
- Ask Yes at User Account Control (UAC) warning message.
- In Windows 7.
- Go to Start > All Programs > Accessories.
- Right-click at Command Prompt and click Run As Administrator.
- Ask Yes at User Account Control (UAC) warning message.

Step 2. Run System File Checker to Repair Windows System Files
1. In command prompt window:
- Type: sfc /scannow
- Press Enter.

2. Now wait until the System File Checker repairs the Windows System Files. When this done, restart your computer.
3. Try to connect to your WiFi network.
6. Remove invalid DHCP Registry entries.
If Windows cannot find any wireless networks and you face the following error in Event viewer “WLAN Auto Config service on the local computer. Error 1068: The dependency service or group failed to start”, then proceed to the steps below to remove the invalid registry entries from Windows Registry.
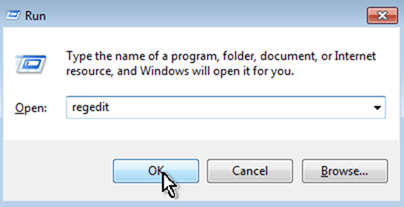
1. Open Registry Editor: To do that:
- Simultaneously press “Windows” + “R” keys to open the RUN window.
- In “RUN” window “Open” box, type: regedit
- Press Enter.

2. At the left pane, press the “+” sign and navigate to this key:
HKEY_LOCAL_MACHINESYSTEMCurrentControlSetServicesDhcp
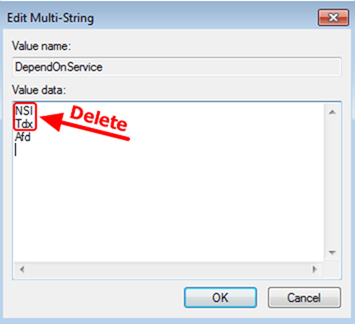
3. Double click on DependOnService at the right pane.
- Delete all the words in text area, except “Afd“, and click OK

4. Then navigate to this key on the left:
HKEY_LOCAL_MACHINESYSTEMCurrentControlSetservicesEapHost
5.Double click on DependOnService at the right pane.
- Delete everything in the text area and click OK.
6. Restart your computer and then try to connect to your Wireless Network.
That’s all folks! Did it work for you?
Please leave a comment in the comment section below or even better: like and share this blog post in the social networks to help spread the word about this solution.
Bài liên quan
- FIX: Error 0x81000203 in System Restore. (Solved)
- Cannot Access Shared folder. User has not been granted the requested logon type at this computer. (Solved)
- FIX: Cannot clear TPM – 0x80284001, 0x80290300 or 0x80290304.
- Unable to Schedule Teams Meeting in 15 or 10 minutes slots (Solved)
- How to Share Folder without Username/Password on Windows 10/11.
- FIX: Thunderbird High CPU or Memory Usage issues.


