Outlook is a popular email client application, but sometimes does not work as expected. One of the Outlook issues, that users faces commonly, is that the Outlook Search is not working or does not return the correct search results. The Outlook Search issues, can appear suddenly or after updating (or upgrading) Outlook or Windows to a more recent version.
If Outlook search does not work, or doesn’t return all or the correct results, then follow the instructions mentioned below to resolve Outlook search problems.
How to fix Outlook Search problems.
Method 1. Check if the Search function is working in Outlook Safe Mode.
The first method to resolve Outlook search problems is to see if the Outlook search function is working normally in Safe mode.
1. To start Outlook in Safe Mode, hold down the CTRL key (on your keyboard) and then double-click at Microsoft Outlook shortcut, or:
1. Press simultaneously the Windows
+ R keys to open the run command box.
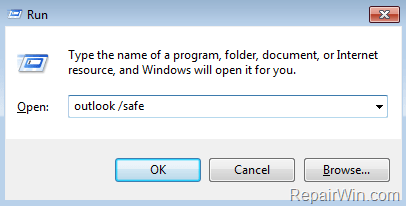
2. Type: outlook /safe and click OK.
2. In Outlook safe mode, perform a search. If Outlook search is working appropriately, then disable all Add-ins and restart Outlook normally. To disable Outlook Add-Ins:
- To disable the Add-Ins in Outlook 2016, 2013 or 2010:
1. Click the File menu and select Options.
2. Select Add-ins at the left pane.
3. At the right pane, select COM Add-ins and click Go…
4. Uncheck the checkbox next to the Add-in that you want to disable and click OK.
5. Restart Outlook
- To disable the Add-Ins in Outlook 2007:
1. On the Tools menu, click Trust Center.
2. Select Add-ins on the left pane.
3. At the right pane, select COM Add-ins and click Go…
4. Uncheck the checkbox next to the Add-in that you want to disable and click OK.
5. Restart Outlook.
Method 2. Check Outlook Indexing Settings and Rebuild Index.
The next method to fix search problems in Outlook, is to ensure that Outlook data files (PST & OST) is included in Indexing. To do that:
- Outlook 2016, 2013 or 2010 *
1. Click the File menu and select Options.
2. Select Search on the left pane.
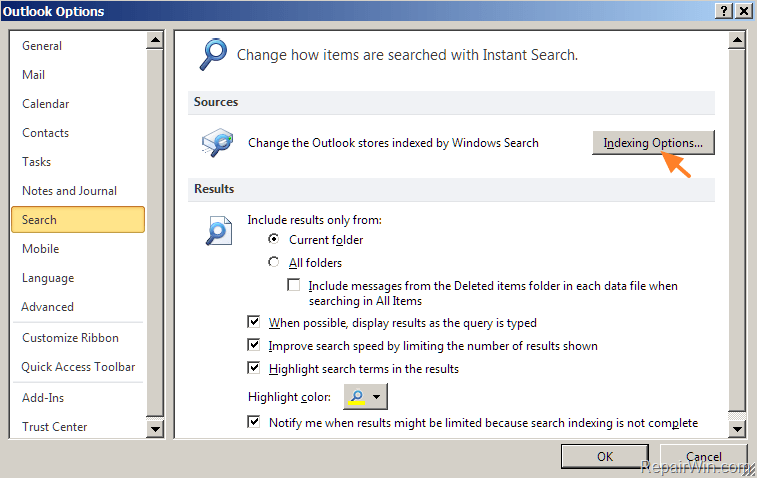
3. At the right pane, select Indexing Options.
* Note: If you ‘re using Windows 7 or Outlook 2007, type Indexing on the Search box and then open Indexing Options.
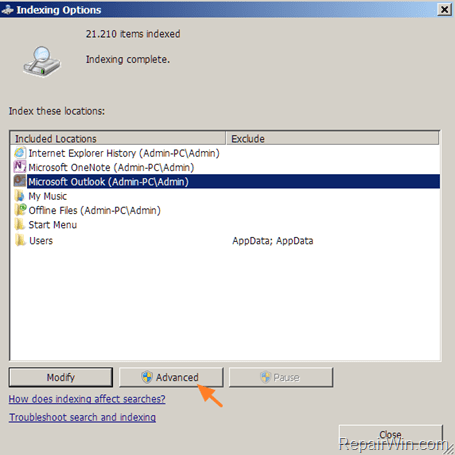
4. Make sure that Microsoft Outlook, is included in Indexing Locations list and then click Advanced. *
* If Microsoft Outlook is not listed, then click Modify and add it to the above list.
5. At Advanced Options, click the File Types tab and check the pst and the ost checkboxes.
6. Then click the Index Settings tab and click the Rebuild button.
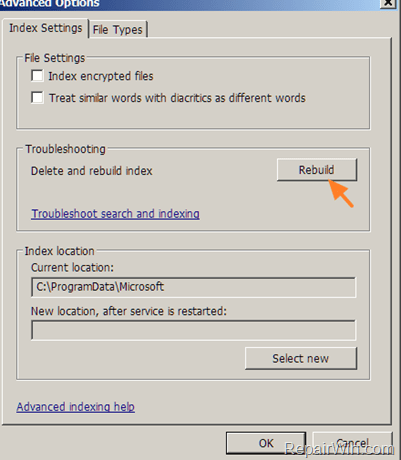
7. When the Indexing is completed close all windows and restart Outlook.
Method 3. Disable Outlook Indexing in Registry.
1. Open Registry Editor: To do that:
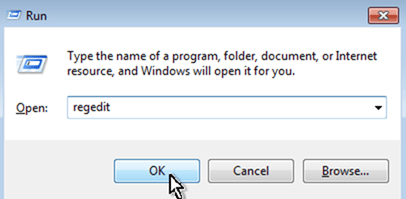
- Simultaneously press “Windows” + “R” keys to open the RUN window.
- In “RUN” window “Open” box, type: regedit
- Press Enter.
2. Navigate to the following key at the left pane: *
- HKEY_LOCAL_MACHINESOFTWAREPoliciesMicrosoftWindowsWindows Search
* If the Windows Search key did not exist, then right click on the Windows key and create it manually.
3. At right panel double click on PreventIndexingOutlook value. *
* If the PreventIndexingOutlook value did not exist, then right click on an empty space at the right pane and choose New -> DWORD (32-bit). Type ” PreventIndexingOutlook” as a name and press Enter.
4. Change the value data to 0 to disable the Indexing in Outlook.
5. Close Registry Editor and restart your PC.
6. Open Outlook and perform a search. If the search is still not working, then open registry again and change the PreventIndexingOutlook value data to 1
Note: The default value data for the PreventIndexingOutlook value is “1” which enables Indexing in Outlook.
Method 4. Fix Outlook Search with Outlook PST Repair.
Another method to fix Outlook search problems, is to scan and repair the Outlook data files for corruptions by using the Inbox Repair Tool (SCANPST). To do that:
1. According your Windows architecture (32-bit or 64-bit) and Office Version, navigate to the mentioned location bellow and double click at “SCANPST.EXE” application.
Outlook 2016
32-bit Windows > C:Program FilesMicrosoft OfficeOffice16
64-bit Windows > C:Program Files (x86)Microsoft OfficeOffice16
64-bit Outlook > C:Program FilesMicrosoft OfficeOffice16
Click-to-Run > C:Program FilesMicrosoft Officerootoffice16
Outlook 2013
32-bit Windows > C:Program FilesMicrosoft OfficeOffice15
64-bit Windows > C:Program Files (x86)Microsoft OfficeOffice15
64-bit Outlook > C:Program FilesMicrosoft OfficeOffice15
Click-to-Run > C:Program FilesMicrosoft Officerootoffice15
Outlook 2010
32-bit Windows > C:Program FilesMicrosoft OfficeOffice14
64-bit Windows > C:Program Files (x86)Microsoft OfficeOffice14
64-bit Outlook > C:Program FilesMicrosoft OfficeOffice14
Outlook 2007
32-bit Windows > C:Program FilesMicrosoft OfficeOffice12
64-bit Windows > C:Program Files (x86)Microsoft OfficeOffice12
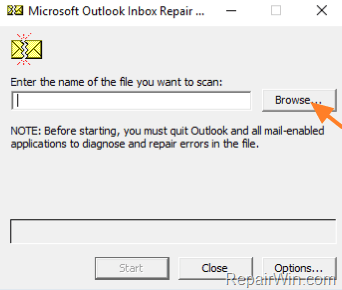
2. At Inbox Repair tool, click Browse and then select the Outlook Data File that you want to repair. (e.g. Outlook.pst) *
* Notes:
1. If you ‘re using Outlook 2013 or 2016 the default store location for the Outlook Data files (PST or OST) is:
- C:Users%Username%DocumentsOutlook Files<Mail_Account>.pst
2. If you ‘re using Outlook 2010 or 2007, the default store location for the Outlook Data files (PST or OST) is:
- C:Users%Username%AppDataLocalMicrosoftOutlookOutlook.pst
3. Finally press Start to start the repair.
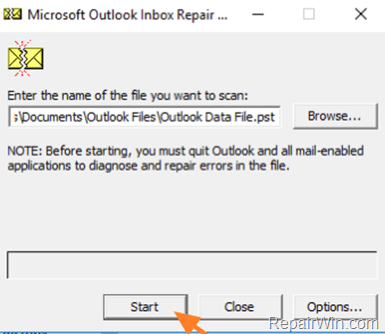
4. When then the repair is complete, close the Inbox Repair Tool utility and launch Outlook.
Method 5. Install & Uninstall Updates.
– If you ‘re using Windows 7 then install the following update: KB4022168
– If you ‘re using Windows 10 Version 1607 & Outlook 2010, 2013 or 2016, install this Update: KB4022723
– If you ‘re using Windows 10 Version 1703 & Outlook 2010, 2013 or 2016, install this Update: KB4022725
– Microsoft has also reported issues with Outlook, after installing the following updates:
- Windows 10: KB4022715, KB4022716
- Windows 8.1: KB4022720, KB4022726
- Windows 7: , KB4022722, KB4022719
- Outlook 2016: KB3191932
- Outlook 2013: KB3191938
- Outlook 2010: KB3203467
- Outlook 2007: KB3191898
So, see if one of the above updates are installed on your system and if so, then remove them. To view and uninstall updates in Windows:
1. Type view installed updates on the search box and then click at the result that appears above.
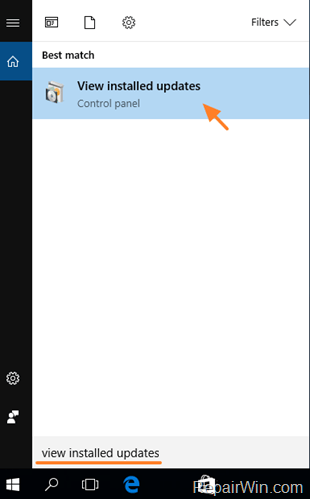
2. At Installed Updates panel, search for the update that you want to see if it is installed, by typing the update number (e.g. 4022168), at the “Search Installed Updates” box on the top right.
3. Once you find the Update, select it and click Uninstall
That’s all folks! Did it work for you?
Please leave a comment in the comment section below or even better: like and share this blog post in the social networks to help spread the word about this solution.

