The Windows 10 Bad Image error, with Error Status 0xc000012f or 0xc0000020, usually appears after installing a Windows 10 Update or after upgrading Windows 10 to its latest build. A “bad image” error in Windows 10, means that one or more files of the application mentioned in the error message are corrupted and the application must be uninstalled and reinstalled from scratch in order to work properly.

This tutorial contains instruction to fix the “Bad Image” error on an application in Windows 10, with Error Status 0xc000012f or 0xc0000020.
- Related Article: FIX: OneDrive.exe – Bad Image Error: SyncEngine.DLL is either not designed to run on Windows.
How to FIX Bad Image Error in Windows 10.
Method 1. Uninstall & re-Install the Faulty Application from Windows 10.
The first method to fix the Bad Image error in Windows 10, is to remove and reinstall the corrupted application:
Step 1. Uninstall the Application with the “Bad Image” Error.
On the “Bad Image” error message, notice the name of the application with the problem. Then according the type of the application (Program or App), proceed and uninstall it from your computer.
- To Uninstall a program in Windows 10:
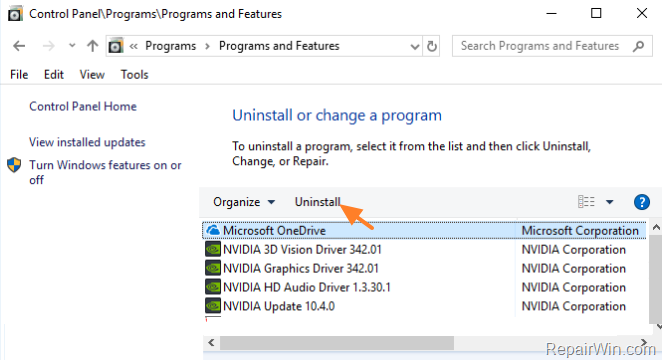
- Navigate to Windows Control Panel and open Programs and Features.
- Select the damaged program and click Uninstall.

- To Uninstall an App in Windows 10:
- From the Start menu
![image_thumb[2]_thumb image_thumb[2]_thumb](data:image/svg+xml;base64,PHN2ZyB4bWxucz0iaHR0cDovL3d3dy53My5vcmcvMjAwMC9zdmciIHdpZHRoPSIyMiIgaGVpZ2h0PSIyMyIgdmlld0JveD0iMCAwIDIyIDIzIj48cmVjdCB3aWR0aD0iMTAwJSIgaGVpZ2h0PSIxMDAlIiBzdHlsZT0iZmlsbDojY2ZkNGRiO2ZpbGwtb3BhY2l0eTogMC4xOyIvPjwvc3ZnPg==) open Settings
open Settings  and then click Apps.
 - Select the damaged App with the and click Uninstall.
- From the Start menu

Step 2. Download and Re-Install the Application on your PC.
1. When the application is removed, restart your computer.
2. After restart, proceed to re-install the removed application.
Method 2. Repair Windows 10 System Files.
1. Open Command Prompt as Administrator.
2. In command prompt give the following command and press Enter:
- DISM.exe /Online /Cleanup-image /Restorehealth

3. When the DISM operation is completed, type the following command and hit Enter:
- sfc /scannow

4. Now wait until the System File Checker repairs the Windows System Files.
5. When this done, restart your computer and check if the Bad Image error persists.
Method 3. Fix Windows 10 Bad Image by Uninstalling the Last Installed Update.
If the “Bad Image” error in Windows 10 appeared after installing a Windows 10 Update, proceed and uninstall the update by following the instructions below:
1. From the Start menu ![]() open Settings
open Settings ![]() and then click Update & Security.
and then click Update & Security.
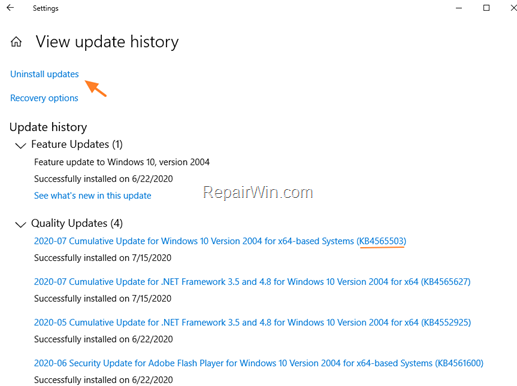
2. Click View update history.

3. Notice the KB number of the last installed update and click Uninstall Updates.

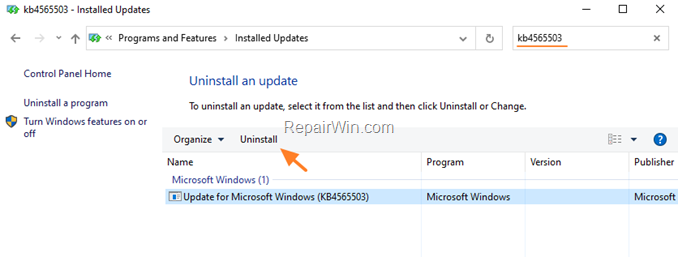
4. At the Installed Updates window:
- Type the KB number of the Windows Update in the search bar and press Enter.
- Highlight the update on the results and click Uninstall.

5. After uninstalling the update, restart the PC and check if the “Bad Image” persists.
Method 4. Restore Windows 10 to an Earlier version.
1. From the Start menu ![]() open Settings
open Settings ![]() and then click Update & Security.
and then click Update & Security.
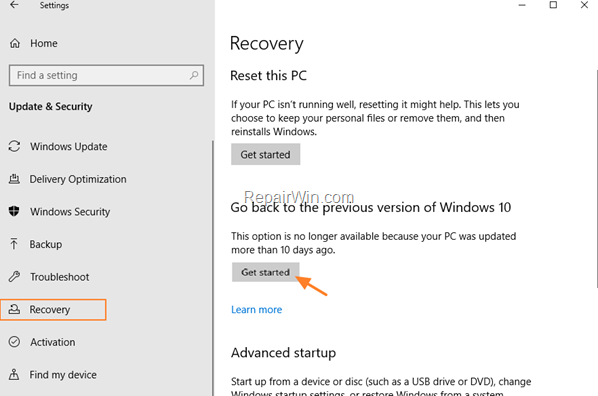
2. Choose Recovery on the left and then, under the ‘Go back to the previous version of Windows 10’ section, click the Get started button.

3. Follow the on-screen prompts to restore Windows 10 to a previous version.
That’s all folks! Did it work for you?
Please leave a comment in the comment section below or even better: like and share this blog post in the social networks to help spread the word about this solution.


