Sometimes there is the need to create a new partition or to resize existing partitions on a disk to cover up our needs. In this tutorial I ‘ll show you how manage partitions easy, by using one of the following free Disk Management utilities: EaSeus Partition Master and AOMEI Partition Assistant.
After Windows 7 version, Microsoft makes easier to shrink or to extend a partition’s size, by using the built-in Windows Disk Management utility. But, the Disk Management utility many time fails to cover our needs or to make the required partition changes. For that reason, I prefer to use an alternative partition manager utility in order to Resize, Shrink or Extend partitions in a Windows PC.
This tutorial contains instructions to easy manage partitions (Resize/Move/Delete) in Windows 10/8/7 or Vista by using the EaSeus Partition Master or AOMEI Partition Assistant partition manager tools.
How to easy Manage Partitions in Windows 10/8/7/Vista.
1. EaSeus Partition Master (FREE).
EaseUS Partition Master is my favorite tool to manage partitions in Windows. EaseUS Partition Master, is an easy to use tool that allows you to make the required partition changes without affecting your data. *
* Note: I strongly suggest to backup your important data, before making changes to a partition/disk.
To manage your partitions with EaseUS Partition Master, you have first to download and install the program on your computer. After installation:
1. Launch EaseUS Partition Master.
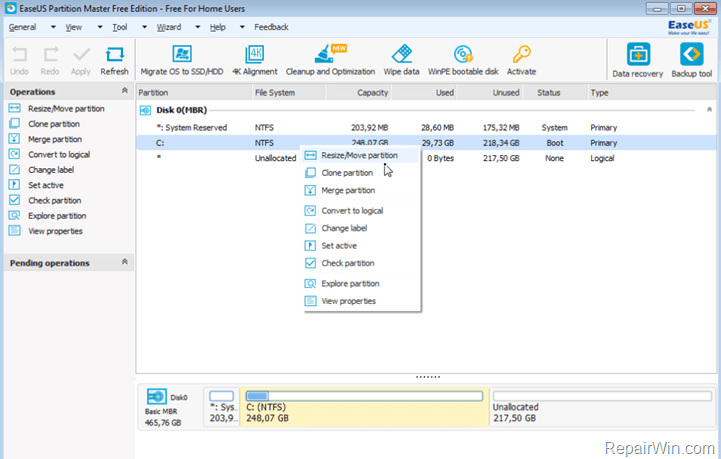
2. Select the partition/drive that you want to manage and right click on it.
3. From the right-click menu, select the option that you want to apply to the selected partition (Resize, Move, Merge Partition, etc.).

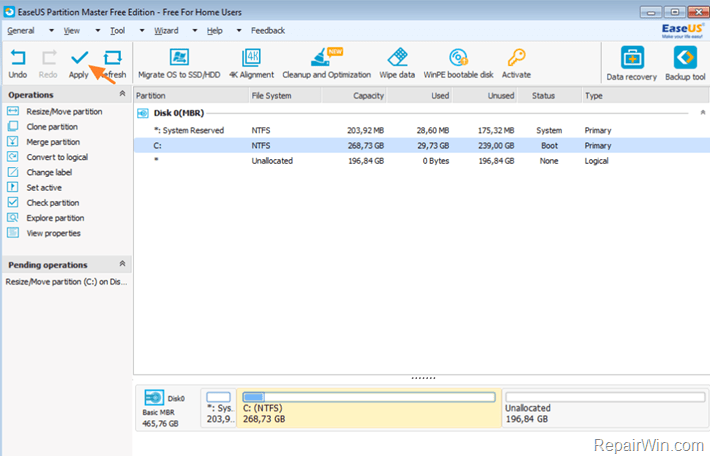
4. After making the change(s), click OK and select Apply from the main menu to apply the change(s).

2. AOMEI Partition Assistant (FREE).
AOMEI Partition Assistant Standard, is my second favorite disk management utility, that – in general – offers the same features as EaSeus Partition Master.
* Note: I strongly suggest to backup your important data, before making changes to a partition/drive.
To manage your partitions with AOMEI Partition Assistant Standard, you have first to download and install the program on your computer. After installation:
1. Launch AOMEI Partition Assistant.
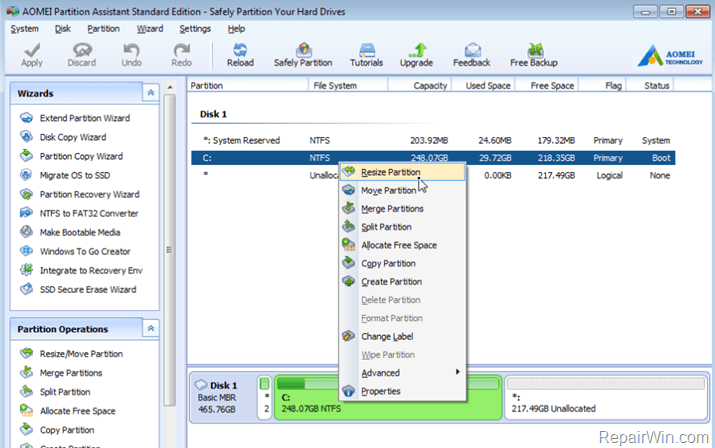
2. Select the partition that you want to make changes to and right click on it.
3. From the right-click menu, select the option that you want to make to the selected partition (Resize Partition, Move Partition, Create Partition, Split or Merge Partition, etc.).

4. After making your choices, click OK and select Apply from the main menu to apply the change(s).
That’s all! Did it work for you?
Please leave a comment in the comment section below or even better: like and share this blog post in the social networks to help spread the word about this solution.


