This tutorial contains two different free and secure methods to password protect a folder in Windows 10/8/7 OS. If you lock a folder with a password, it will not be accessible to anyone other than you. Protecting a folder with a password, is useful in cases where you share your computer with others and you don’t want someone else to access and read your private files.
- Related article: How to Password Protect your Windows 10 PC with BitLocker.
How to Lock a Folder with a Password in Windows 10.
Method 1. How to Lock and Encrypt Files with 7-zip (Windows All Versions).
The easiest and most secure method, to protect a folder with a password in Windows, is by using the 7-Zip archiver utility, that also supports encryption. To encrypt and password protect a folder/file with 7-zip:
1. Download and install the 7-Zip archiver program.
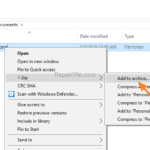
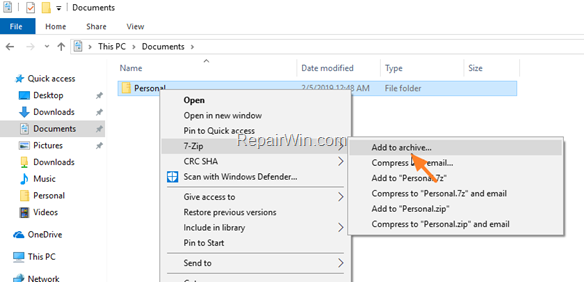
2. Right click on the folder (or file) that you want to protect with a password and choose: 7-Zip > Add to archive.
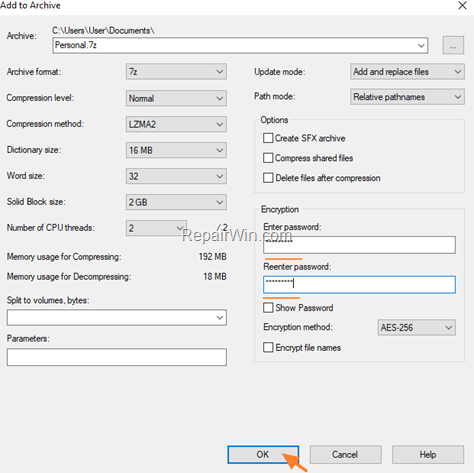
3. At ‘Add to archive’ options, specify a strong password and then click OK.
4. Then delete the uncompressed folder (or file) and you done!
Method 2. How to Encrypt a Folder with EFS Protection (Windows Pro & Enterprise).
The EFS Protection is a built in encryption tool, in Windows 10 Professional and Enterprise editions. If you protect a folder or a file with EFS encryption is very difficult to others to access the encrypted files, without having the decryption key (certificate PFX key).
The only downside of EFS encryption, is that the encryption will be removed if you copy the encrypted files on another network computer or if you email the encrypted files.
In addition, when you encrypt your EFS files, the decryption key (certificate) is stored locally on your computer. This means that anyone with your password will also have access to your encrypted files. For that reason, if you encrypt your files with the EFS encryption, specify a strong login password and do not share it with others.
- Related Article: How to Decrypt EFS Encrypted files and Remove EFS Encryption.
To encrypt a folder or file with EFS:
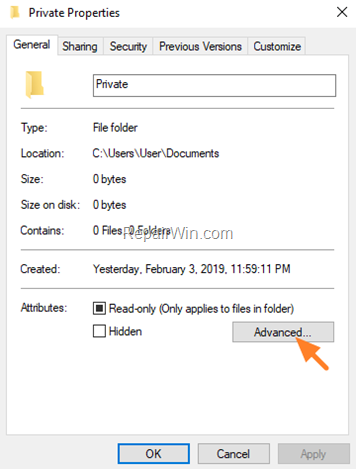
1. Right click on the folder (or file) that you want to protect and select Properties.
2. At General tab, click Advanced.
3. Select Encrypt files to secure data and then click OK.
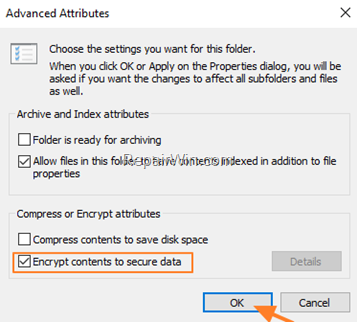
4. Then click Apply and OK again to save the changes and exit.
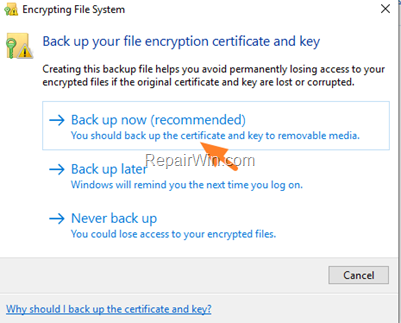
5. At this point Windows will prompt you to backup the recovery key. Click Backup your file encryption key.

6. Then click Back up now (recommended) and save the decryption certificate key to a USB drive.
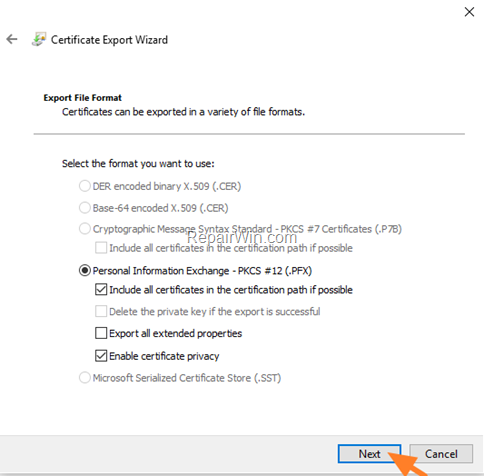
7. At the Certificate Export wizard click Next at the Welcome screen.
8. Then click Next again at Export File Format screen.
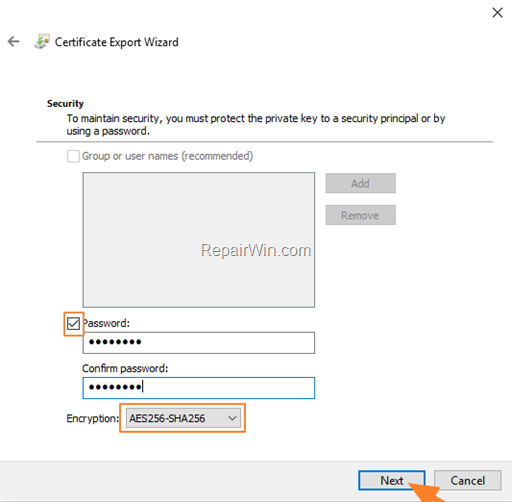
9. At Security options:
1. Check the Password box.
2. Type a password for the exported certificate key.
3. Select AES256-SHA256 encryption
4. Click Next.
10. Click Browse and Save the certificate (.pfx) file on your computer.
11. When done, click Next to continue.

12. Finally click Finish.
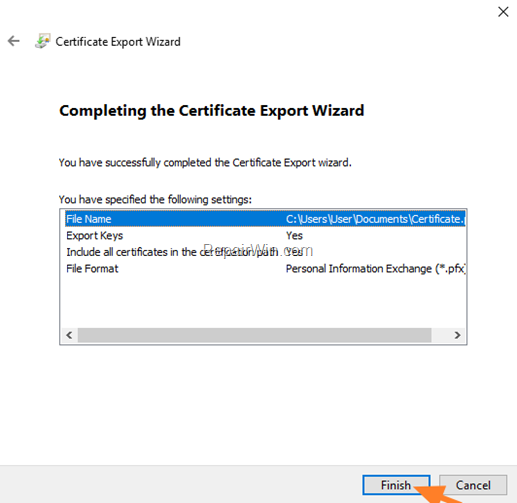
13. When the export is completed, save the exported certificate key (.pfx file) to another safe location (e.g. to a USB disk).
TIP: When you encrypt a folder (or files) with EFS, the decryption key (certificate) is stored on your user profile folder. So, if another user has your Windows login password, it can open and read the encrypted files. To avoid this from happening, do not share your login password, or, remove (uninstall) the decryption certificate from your profile when you leave your PC and reinstall it when you come back. *
* Note: To remove and re-import the recovery key (certificate), go to:
a. Control Panel > Internet Options.
b. At ‘Internet Options’ click the Content tab and then click Certificates.
c. At ‘Personal’ tab click the Remove button, to remove the decryption key (certificate), or click the Import button to reinstall the decryption certificate from the USB drive.
- Related Article: How to Decrypt EFS Encrypted files and Remove EFS Encryption.
That’s all folks! Did it work for you?
Please leave a comment in the comment section below or even better: like and share this blog post in the social networks to help spread the word about this solution

