On a Windows 10, 8 or 7 based computer the following BSOD 0x0000001 error may occur during startup: ”Your PC/Device needs to be repaired. An unexpected error has occurred. Error code : 0x0000001”, or “Your PC needs to be repaired. The application or operating system couldn’t be loaded because a required file is missing or contains errors. File: windowssystem32winload.efi”.
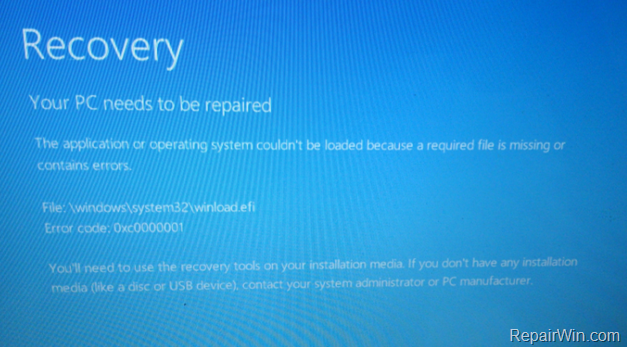
The boot error 0x0000001, commonly occurred if the main hard disk (OS disk) becomes damaged and Windows cannot read the boot configuration data (BCD). Another reason of the “Your PC/Device needs to be repaired. Error code : 0x0000001” issue, is the unsuccessful installation of Windows update.
This tutorial contains instructions to resolve the “Your PC/Device needs to be repaired. Error code : 0x0000001” on Windows 10/8/7/Vista OS.
HOW to FIX: Your PC/Device needs to be repaired. Error code : 0x0000001
Requirements: In order to fix the “Your PC/Device needs to be repaired. Error code : 0x0000001” problem, by following the steps below, you will need to boot you computer from a Windows installation media. If you don’t own a Windows Media then you can create one by using Microsoft’s Media Creation tool.
- Related articles:
- How to create a Windows 10 USB installation media.
- How to create a Windows 10 DVD installation media.
Method-1: System Restore.
The first to repair the boot error Error code: 0x0000001, is to try to restore your computer to a previous working state. To do that:
1. Boot your computer from the Windows installation media.
2. Press Next at Language options screen.
3. Choose Repair your computer.
4. Choose Troubleshoot -> Advanced Options –> System Restore.
5. Follow the onscreen instructions and restore your computer to an earlier point.
Method-2. Repair the Boot Configuration Data (BCD).
The second method to fix the “Your PC needs to be repaired, Error 0x0000001”, is to repair the BCD. For that task, follow the instructions below according your OS and your system architecture (UEFI or Legacy).
Windows 10 or 8/8.1 OS (UEFI Based Systems) *
* Note: The below steps, to repair the boot configuration data, usually works on UEFI based systems, with Windows 10, 8 or 8.1 OS installed. If your system doesn’t support UEFI, or this method does not work for you, then follow the steps for LEGACY based systems below.
1. Boot your computer from the Windows recovery media.
2. Press Next at Language options screen.
3. Choose Repair your computer.
4. Then choose Troubleshoot -> Advanced Options –> Command Prompt.
5. In command prompt type: diskpart & press Enter.
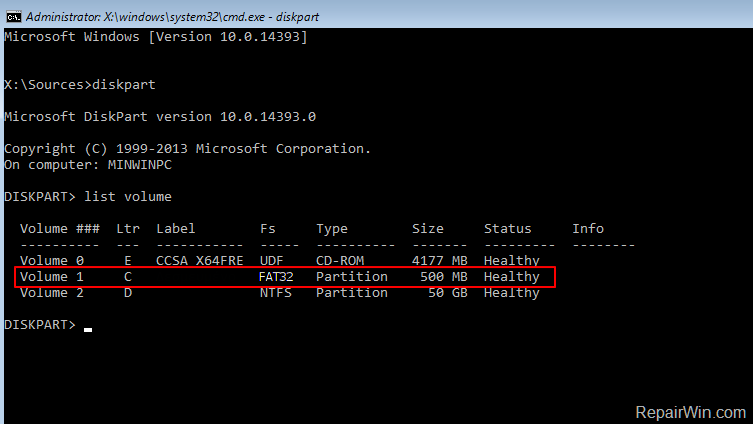
6. In “DISKPART” prompt, type: list volume & press Enter.
7. Now find out the Volume number of the FAT32 * partition and the drive letter of the OS volume.
* Notes:
1. The FAT32 partition, with size 100-500MB, is also known as “EFI” volume (System Volume) because it contains the Boot Configuration Data on UEFI based systems.
2. If you own a LEGACY based system, then find out the Volume number of the “System Reserved” volume (FS=NTFS & Size=100–500MB).
3. The OS (Operating System) Volume is usually the biggest volume in size (GB) and contains the Windows folder.e.g. From the picture below, we can understand that the FAT32 partition located at “Volume 1” and the OS volume has the drive letter “D“.
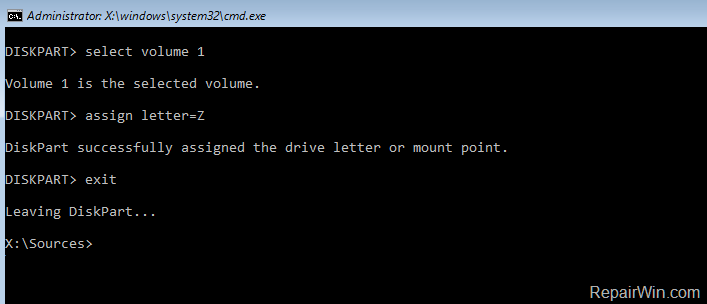
8. Now select the System Volume, by typing select volume 1 & press Enter. *
* Note: Replace “1” with whatever volume number is your System drive.
9. Then assign the drive letter “Z” at the selected volume by typing assign letter=Z & press Enter.
10. Type exit & press Enter, to close DISKPART utility.
11. At command prompt type: bcdboot D:windows /s Z: /f ALL & press Enter to fix the BCD. *
* Note: Replace “D:” with whatever drive letter it is for your OS Volume.

12. Type exit & press Enter to close command prompt.
13. Remove the Windows installation media and Restart your PC.
14. Test if your system can boot to Windows normally.If your system still does not start, then continue to Method 3.
Windows 7 or Vista (LEGACY Based Systems) *
* Note: The below steps, to repair the boot configuration data, usually works on oldest PC’s, that don’t support UEFI. (e.g. PC’s with Windows Vista or Windows 7 OS) and some newer PC’s with Windows 8, 8.1 or 10 OS that installed in Legacy Mode.
1. Boot your computer from the Windows recovery media.
2. Press Next at Language options screen.
3. Choose Repair your computer.
4. Then choose Troubleshoot -> Advanced Options –> Command Prompt.
5. In command prompt give the following commands in order:
- bootrec /fixmbr
- bootrec /fixboot
- bootrec /rebuildbcd
6. If after executing the last command, you receive that “Total Windows installations: 0” then continue to the next step, otherwise skip to step 8.
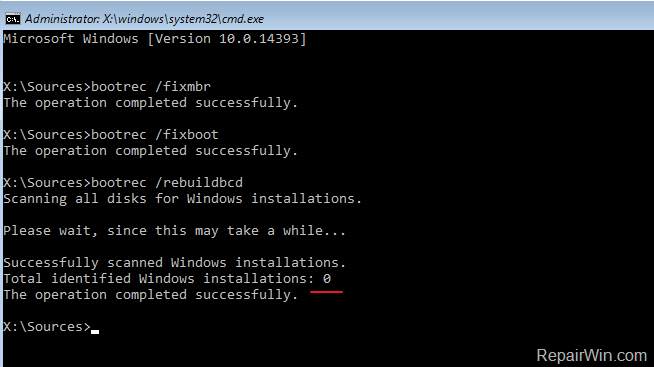
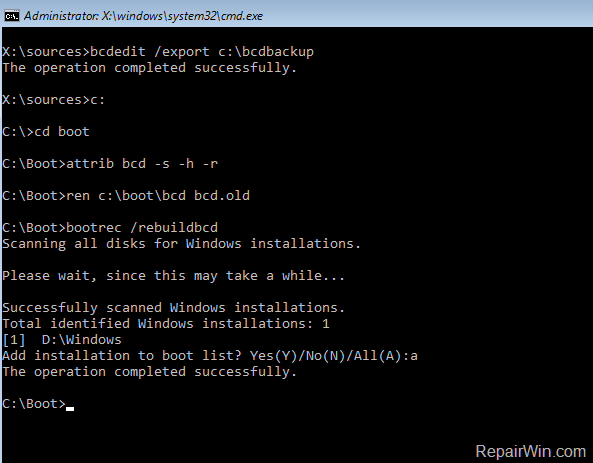
7. If you receive that”Total Windows Installations=0” then give the following commands in order:
- bcdedit /export C:bcdbackup
- C:
- cd boot
- attrib bcd -s -h –r
- ren C:bootbcd bcd.old
- bootrec /rebuildbcd
8. Press “A” to add the installation to boot list and press Enter. Then restart your system.
9. Close command prompt window.
10. Restart your computer and if the boot problem persists, then continue to next Method.
Method-3. Run Start-up Repair.
1. Boot your computer from the Windows installation media.
2. Press Next at Language options screen.
3. Choose Repair your computer.
4. Then choose Troubleshoot -> Advanced Options –> Start-up Repair.
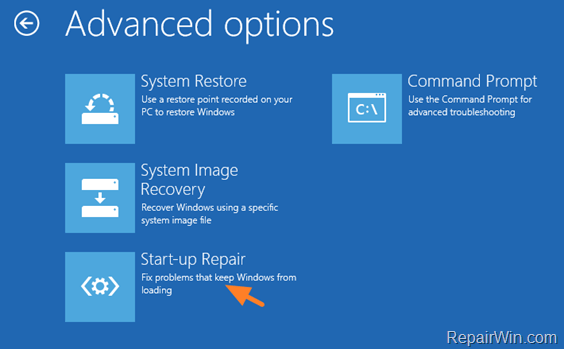
5. Select your Windows OS and then follow the onscreen instructions to fix your computer.
6. If the Startup Repair cannot fix your problem, then continue to the next method.
Method-4. Run Check Disk to Find and Fix Hard Disk Errors.
1. Boot again from the Windows recovery media and launch command prompt.
2. At command prompt give the following command to repair your disk and press Enter. *
- chkdsk D: /F /R
* Note: Replace “D:” with whatever drive letter is your OS Volume.
3. Now wait for the disk check process to finish. (it will take several hours).
4. When the check disk process is completed, apply again the Methods 1 & 2 above and try to boot again.
Method-5. Diagnose Hard Disk’s Health.
If none of the above methods work for you, then your hard disk probably is damaged and you should replace it. To diagnose your hard drive’s health, connect your hard disk to another working computer and use the diagnostic utilities mentioned on this article: Best Hard Drive Test & Diagnostic Tools to Check Hard Disk’s Health. *
* Note: If your hard drive is healthy, then backup your files and perform a clean installation of Windows 10.
That’s all folks! Did it work for you?
Please leave a comment in the comment section below or even better: like and share this blog post in the social networks to help spread the word about this solution.

