If you find yourself in the frustrating situation where “Windows 10/11 won’t boot,” fear not, you’re not alone.
The “Windows 10/11 won’t boot” issue is a frustrating and disruptive problem where a computer running the Windows 11 or the Windows 11 operating system fails to start up properly. When this issue occurs, the computer may display various error messages, a blank screen, or simply get stuck during the boot process.
The Windows 10/11 won’t boot problem can be due to various reasons, but the most common one is due to a corrupted boot configuration. To troubleshoot this problem, just follow the instructions in this guide and hopefully you will fix the Windows 10/11 not booting problem in no time. (This solution works almost 100% of the time).
How to Fix: Windows 11 or Windows 10 Does Not Boot.
Step 1. Enter in Automatic Repair options.
1. Turn off your PC by pressing the power button for 5-10 seconds.
2. Turn on your PC again, and when you see the spinning dots, press again the power button for 5-10 seconds to to re-terminate its operation.
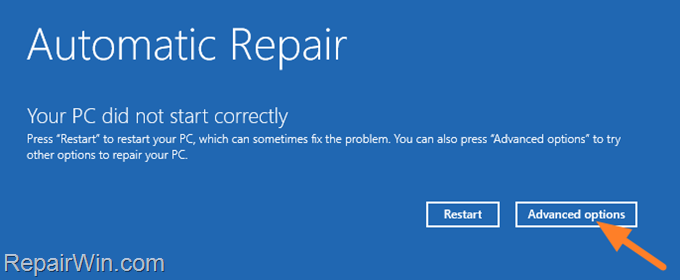
3. Repeat the above step one more time and then leave Windows to enter in Automatic Repair mode and then click Advanced options.

Step 2. Repair the Boot Configuration.
Now proceed to fix the Boot Configuration of Windows 10/11, using the below steps.
1. At ‘Choose an option’ screen, click Troubleshoot and then click Advanced Options again.
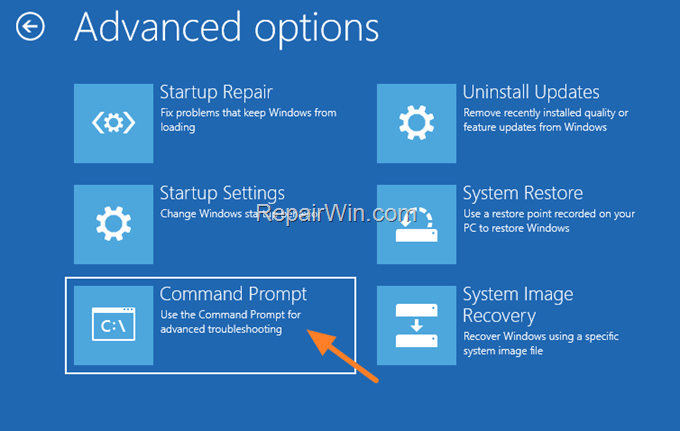
2. At Advanced Options select Command Prompt.

3. In command prompt give the following command and press Enter:
- diskpart
4. Then issue this command and press Enter:
- list volume
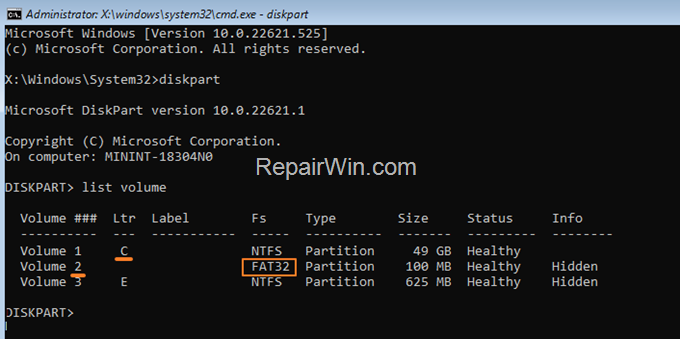
5. Now, look at the results of the “list volume” command and…
a. If you see a FAT32 (FS) partition in the list of volumes, then you own a UEFI based system.
At this case, follow the instructions at Part 1 below to Repair the BCD on UEFI Based Systems.
b. If you don’t see a FAT32 (FS) partition, and all partitions are NTFS, then you own a BIOS/MBR/Legacy based system. At this case, follow the instructions at Part 2 to Repair the BCD on LEGACY Based Systems.
e.g. At the example screenshot below, the system is UEFI based.


Part-1. How to Repair the Boot Configuration on a UEFI Based System.
1. If your system is UEFI, then notice the Volume number of the FAT32 * partition and the drive Letter of the Operating System (OS) partition aka “OS drive”.
e.g. At this example, the FAT32 partition is located at “Volume 2” and the OS drive has the drive letter “C“.

2. Now select the FAT32 volume, with the following command and press Enter. *
- select volume 2
* Note: Replace the number “2” with the volume number of the FAT32 partition.
3. Then assign the drive letter “Z” at the selected volume with this command:
- assign letter=Z
4. Type exit & press Enter, to close DISKPART utility.


5. Now give the following command to format the Z: drive:*
- format Z: /fs:fat32
* Note: Press the “Y” key when asked to delete the drive and after the format press “Enter” at ‘Volume label’ prompt.


5. Finally give the following command to fix the boot configuration data and press Enter. *
- bcdboot C:windows /s Z: /f UEFI
* Note: Replace the letter “C” with whatever drive letter it is the OS drive.


6. When you receive the message “Boot files successfully created“, type exit & press Enter to close command prompt.
7. Then, click Turn off your PC.
8. Turn on your PC again and let Windows to boot normally. If Windows starts normally then you’re done! If not, follow the instructions in this comprehensive guide to get Windows back up and running: How To Repair Windows 11/10 If Windows Cannot Start Normally (All Methods).
Part-2. How to Repair Boot configuration on a LEGACY Based System.
If your system is LEGACY:
1. Type exit to close the DISKPART utility.
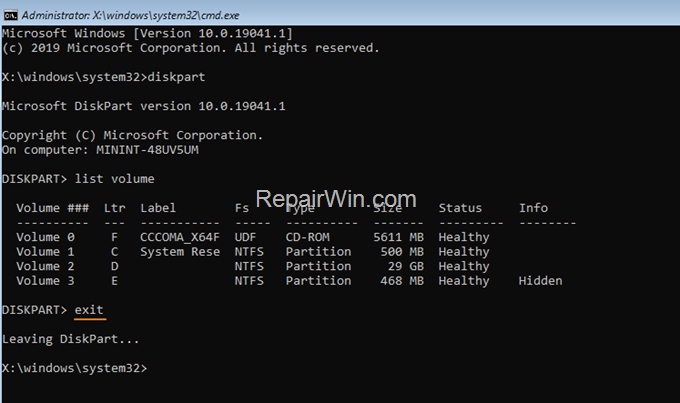

2. Then give the following commands in order:
- bootrec /fixmbr
- bootrec /rebuildbcd
3. If after executing the last command, you receive that “Total Windows installations: 0”, then continue to the next step (4), otherwise skip to step 5.
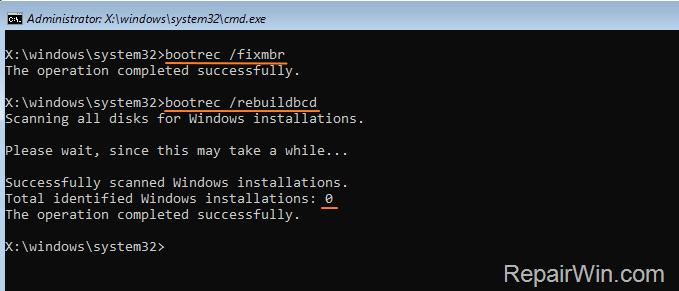

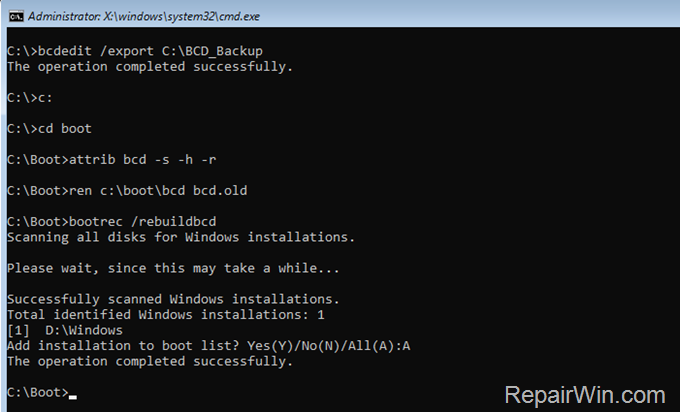
4. If you receive that”Total Windows Installations=0” then give the following commands in order:
- bcdedit /export C:BCD_Backup
- C:
- cd boot
- attrib bcd -s -h –r
- ren C:bootbcd bcd.old
- bootrec /rebuildbcd
5. Press “A” to add the installation to boot list and press Enter.

6. Close the command prompt window and then click Turn off your PC.
7. Turn on your PC again and let Windows to boot normally. If Windows starts normally then you’re done! If not, follow the instructions in this comprehensive guide to get Windows back up and running: How To Repair Windows 11/10 If Windows Cannot Start Normally (All Methods).
That’s all folks! Please leave a comment in the comment section below or even better: like and share this blog post in the social networks to help spread the word about this solution.


