.single .post-author, .post-date {
text-transform: none;
}
,
Last updated: December 27th, 2023
In this guide you will learn how to map a logical drive letter inside the VirtualBox guest machine to a local folder located on the host computer, or to a shared folder located on another machine on the network.
One of the most useful features of VirtualBox is the ability to share files between the host machine and the virtual machine (aka “guest” machine”), by mapping disks or folders to drive letters.
Mapping drives in VirtualBox is a very easy process and in this guide we will show you how to assign logical drive letter(s) in the virtual machine to shared folder(s), in order to easy share your files.
How to Map Shared Folders to VirtualBox Guest Machine. *
* Note: Before proceeding further, go ahead and install “VirtualBox Guest Additions” on the VirtualBox guest machine, if you have not already done so.
1. Map Local Drives or Folders in VirtualBox.
2. Map Network Shared Folders in VirtualBox.
1. How to assign a drive letter to a folder on the host machine in VirtualBox VM.
If you want to map a drive letter in virtual machine to a folder or drive located in the host machine:
1. Open the virtual machine’s Settings.
2. Select the Shared folders tab and then click the plus (+) icon on the right to add a new shared folder.


3a. At Folder Path: click the drop-down menu and select Other…


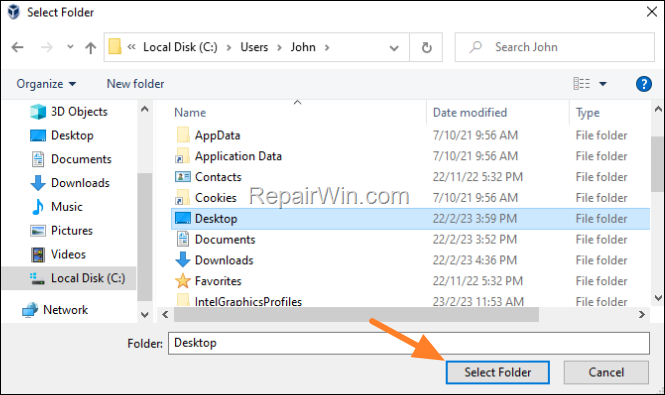
3b. Browse and choose the folder (or the disk/drive) of the host computer that you want to map inside the guest machine and then click Select Folder.


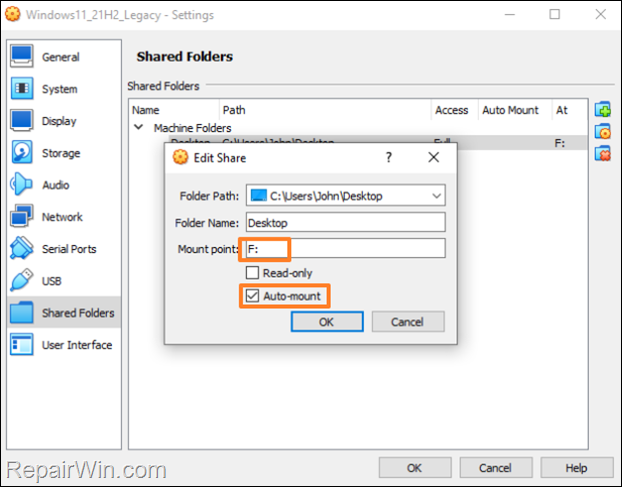
4. At Mount point: type in which drive letter you want to map the selected folder (e.g. “F:”).
5. By default you’ll have Full access (read/write) on the shared folder. If you don’t want that, check the Read-only box.
6. Check the Auto-mount box.
7. When done, click OK.


8. Click OK again to save the changes.


9. Start the VirtualBox machine.
10. Once you’re in Windows, open Explorer and click at “This PC” to see the selected folder mapped to the chosen drive letter.


2. How to assign a drive letter to a Shared Folder on Network in VirtualBox VM.
If you want to map a drive letter to a network shared folder in a virtual machine:
Step 1. Connect to the Shared Folder on the HOST machine.
On the VirtualBox host machine, do the following:
1. Press Windows ![]()
![]() + R keys to open the run command box.
+ R keys to open the run command box.
2. In the run box, type the Computer Name or the IP Address of the network machine with the shared folder, in one of the below formats and then press Enter:
- \Computer-Name
- \IP-Address
Example: If the network machine with the shared folder is named “PC1” with IP Address “192.168.1.70”, type:
- \PC1
or…
- \192.168.1.70


3. When prompted, type the network credentials to access the shares on the network machine, and then – important – check the Remember my credentials checkbox.


4. Now double-click to open the shared folder that you want to map inside the guest machine.


5. Select the network folder path in the address bar and then right-click > Copy.


Step 2. Map Network Shared Folder to a Drive Letter in VirtualBox GUEST machine.
1. Open the virtual machine’s Settings.
2. Select the Shared folders tab and then click the plus (+) icon on the right to add a new shared folder.


3. At Folder Path field, press CTRL + V (or right-click & Paste), to paste the copied path of the Network Shared folder.


4. At Mount point: type in which drive letter you want to map the selected folder (e.g. “G:”).
5. If you don’t want to have Full access (read/write) on the shared folder, check the Read-only box.
6. Check the Auto-mount box.
7. When done, click OK.


8. Click OK again to save the settings.


9. Start the VirtualBox machine.
10. Once you’re in Windows, open Explorer and click This PC to see the network shared folder mapped to the chosen drive letter.


That’s all folks! Did it work for you?
Please leave a comment in the comment section below or even better: like and share this blog post in the social networks to help spread the word about this.

- Author
- Recent Posts
- How to Map Local or a Network Shared Folders in VirtualBox. – December 27, 2023
- Duplicate OneDrive folders in File Explorer in Windows 10/11. – December 20, 2023
- Snipping Tool tool doesn’t cover the whole screen in Windows 11. (Solved) – December 18, 2023
Bài liên quan
- FIX: Error 0x81000203 in System Restore. (Solved)
- Cannot Access Shared folder. User has not been granted the requested logon type at this computer. (Solved)
- FIX: Cannot clear TPM – 0x80284001, 0x80290300 or 0x80290304.
- Unable to Schedule Teams Meeting in 15 or 10 minutes slots (Solved)
- How to Share Folder without Username/Password on Windows 10/11.
- FIX: Thunderbird High CPU or Memory Usage issues.

